ARM Help

Inspection Form

The Inspection Form is the digital vehicle inspection for the car on an invoice. The technician works through your shop's inspection forms item by item, marking each one OKAY, NOT APPLICABLE or another status, and marks anything that needs work as SUGGESTED or REQUIRED with a price built from a service package, the shop's stock parts or a PartsTech quote. The service writer then gets the customer's decision, either at the counter with INSPECTION MANUAL APPROVAL or by sending a link with INSPECTION SMS/EMAIL APPROVAL, or turns the recommendations into a quote. Approved work is added to the invoice; declined work is kept as a recommendation. Marking an item SUGGESTED or REQUIRED on its own never changes the invoice or contacts the customer.

12 how-to answers 59 screenshots Open in ARM Markdown

How do I open the inspection for a vehicle? #

  1. From the Home Screen, click Invoices → Invoice List and open the invoice. The invoice must already be saved; the button does not appear on a quote.
  2. Click INSPECTION FORM.
  3. The inspection opens on its own screen. The top shows the customer's name and phone, the Invoice #, the vehicle, ODOMETER, PLATE and VIN; click the VIN to copy it (the link briefly reads Copied!). The CURRENTLY VIEWING Vehicle Inspection badge shows where you are.
Invoice screen with the Inspection Form button
Inspection Form header with customer, vehicle and header buttons

What do the buttons at the top of the inspection do? #

  1. From the Home Screen, click Invoices → Invoice List, open the invoice and click INSPECTION FORM.
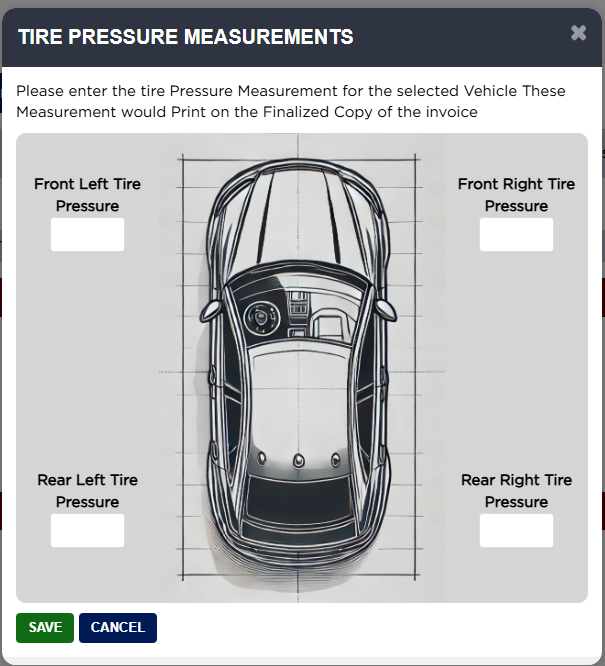
  2. TIRE PRESSURE MEASUREMENTS opens a picture of the car with four boxes, Front Left Tire Pressure, Front Right Tire Pressure, Rear Left Tire Pressure and Rear Right Tire Pressure. Type the readings and click SAVE. They print on the finalized copy of the invoice. Leaving all four boxes blank and saving removes the readings.
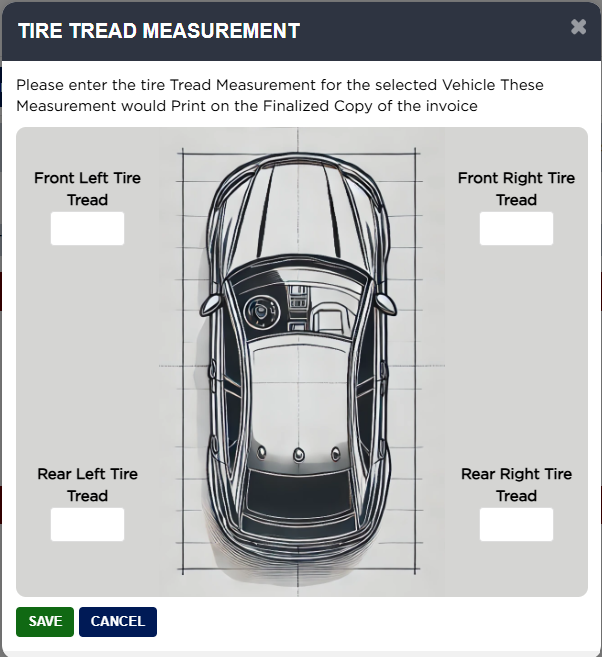
  3. TIRE TREAD MEASUREMENTS works the same way for Front Left Tire Tread, Front Right Tire Tread, Rear Left Tire Tread and Rear Right Tire Tread. The boxes take any text, so type the unit you use (for example 6/32). If your store requires tire measurements before an invoice is finalized, each button shows a red PENDING badge until all four boxes are filled, then a green check.
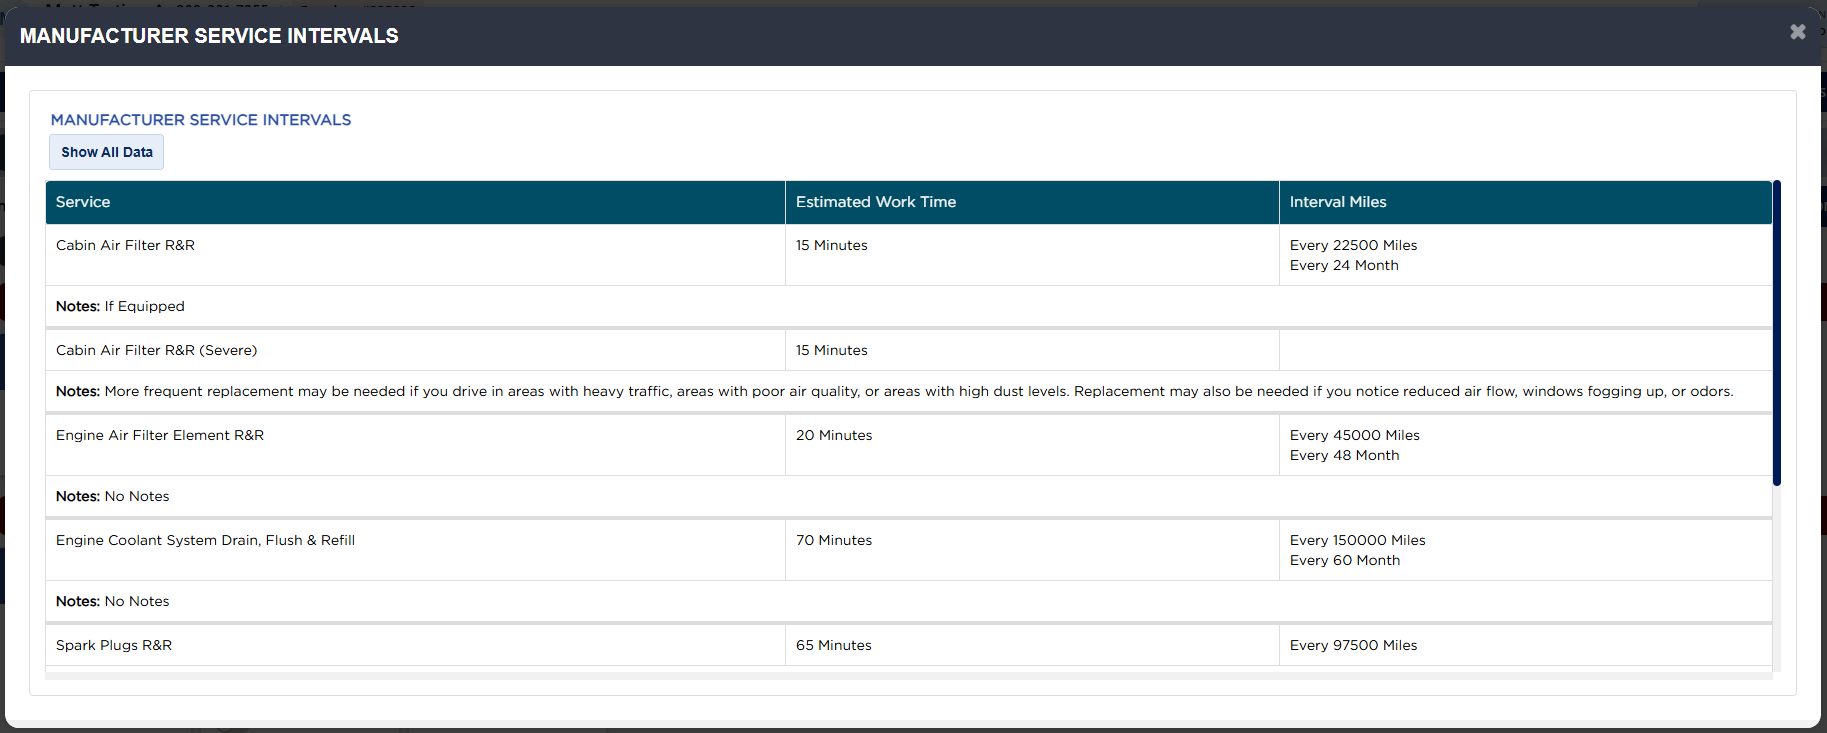
  4. MANUFACTURE SERVICE INTERVALS shows the maker's maintenance schedule for this vehicle: each Service, its Estimated Work Time and Interval Miles (for example Engine Air Filter Element R&R, 20 Minutes, every 45000 miles or 48 months), with notes. Show All Data lists the full schedule. If ARM has no schedule for the vehicle, the window is empty.
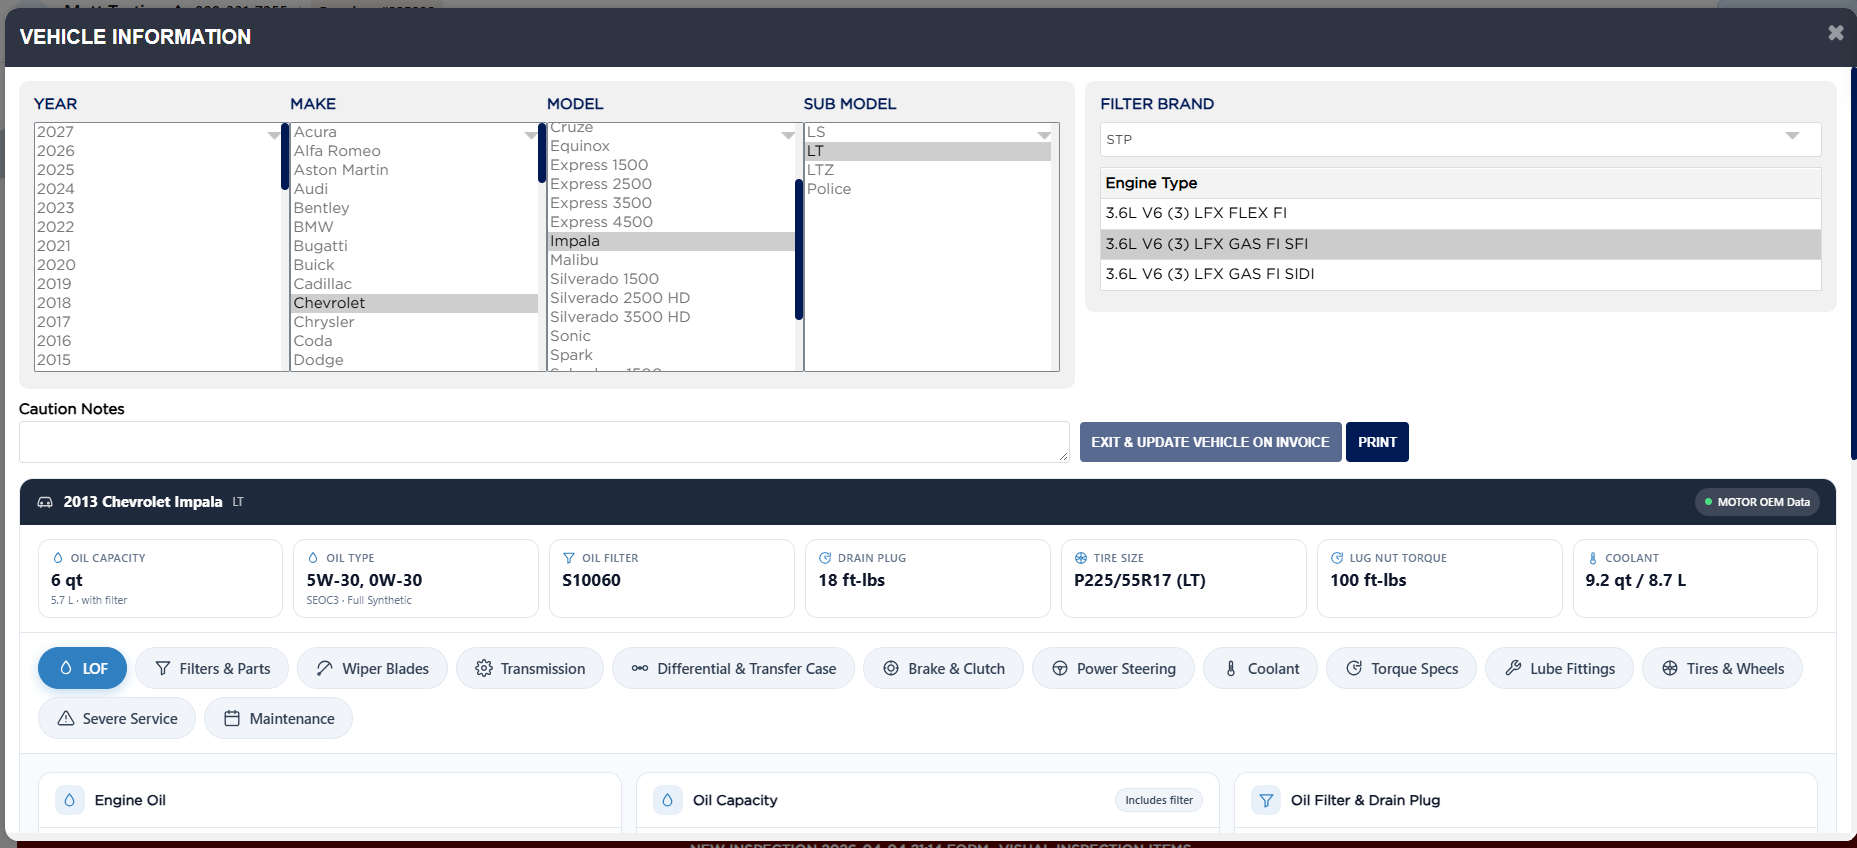
  5. VEHICLE DETAIL SPECS opens Vehicle Information. The top lets you correct the YEAR, MAKE, MODEL, SUB MODEL and engine, choose a FILTER BRAND, and type Caution Notes; EXIT & UPDATE VEHICLE ON INVOICE saves a corrected vehicle to the invoice and PRINT prints the specs.
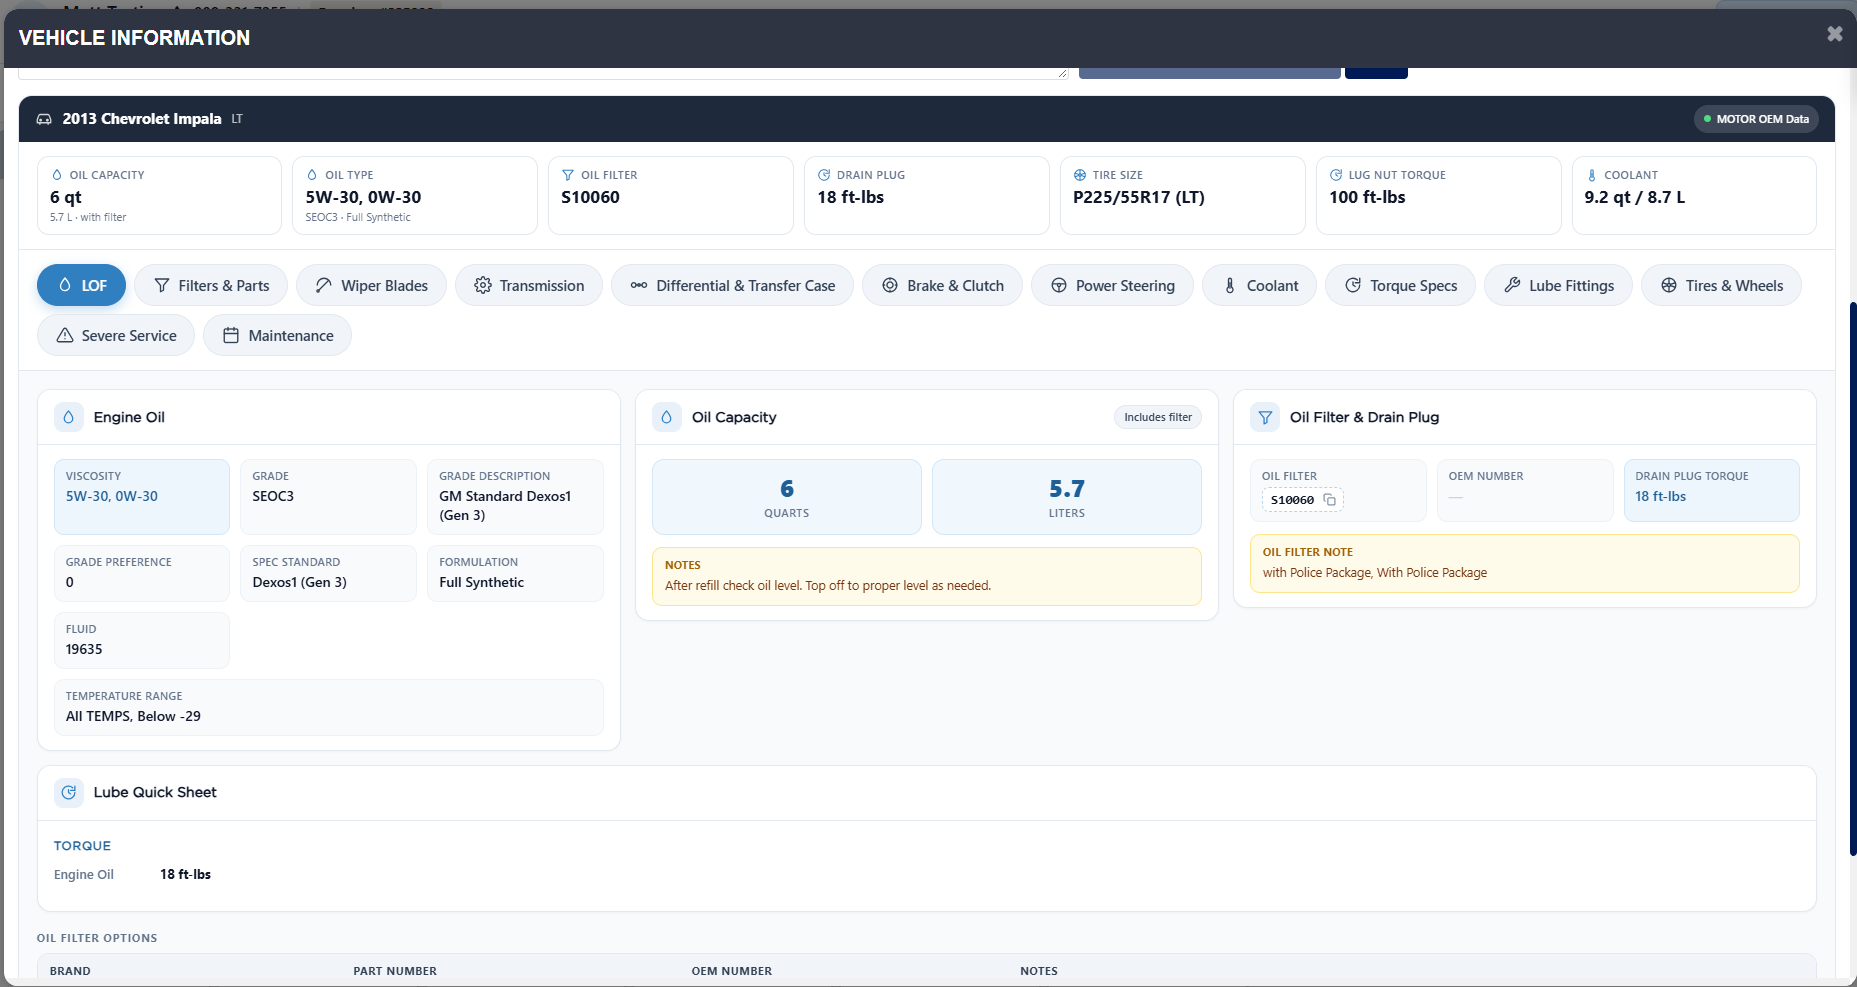
  6. Below, the vehicle's MOTOR data shows oil capacity and type, oil filter, drain plug torque, tire size, lug nut torque and coolant, with tabs for LOF, Filters & Parts, Wiper Blades, Transmission, Brake & Clutch and more. For example the 2013 Chevrolet Impala takes 6 quarts of 5W-30 with an S10060 filter.
  7. PRINT ALL COMPLETED INSPECTION FORMS prints every tab that has results, as one PDF. It appears once at least one item has been saved.
Tire Pressure Measurements popup
Tire Tread Measurement popup
Manufacturer Service Intervals popup
Vehicle Information popup
Vehicle Information MOTOR details
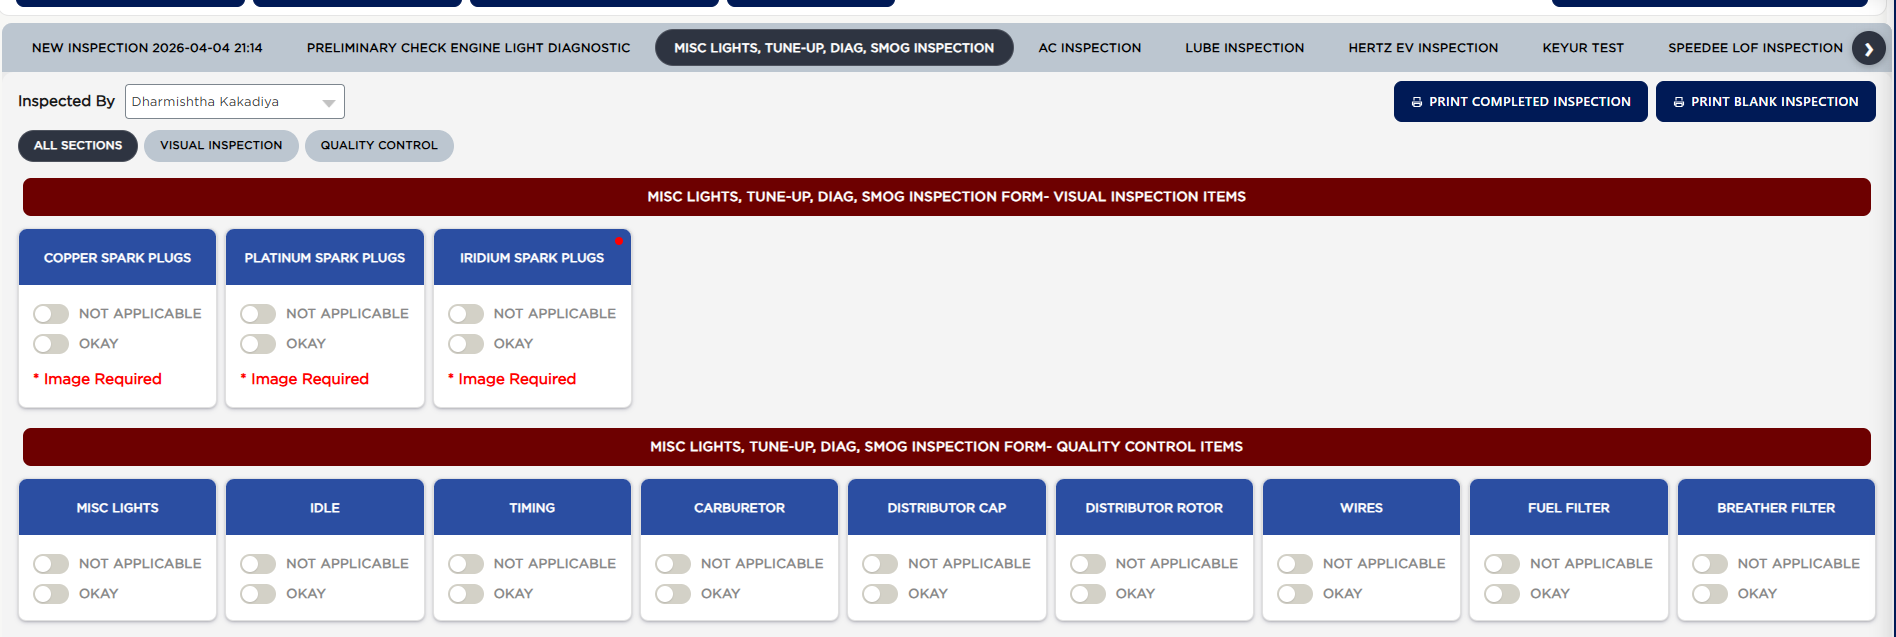
Inspection tab filtered to one section
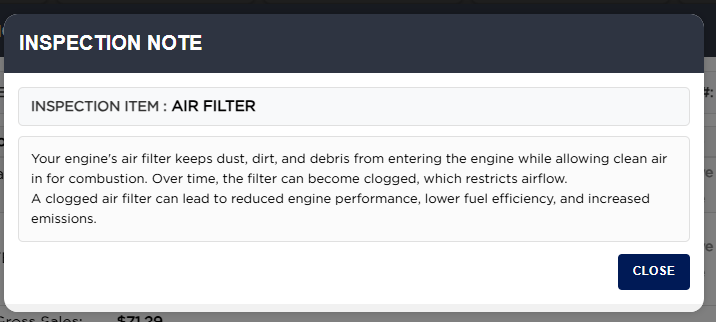
Inspection Note window

How do I fill in the inspection? #

  1. From the Home Screen, click Invoices → Invoice List, open the invoice and click INSPECTION FORM.
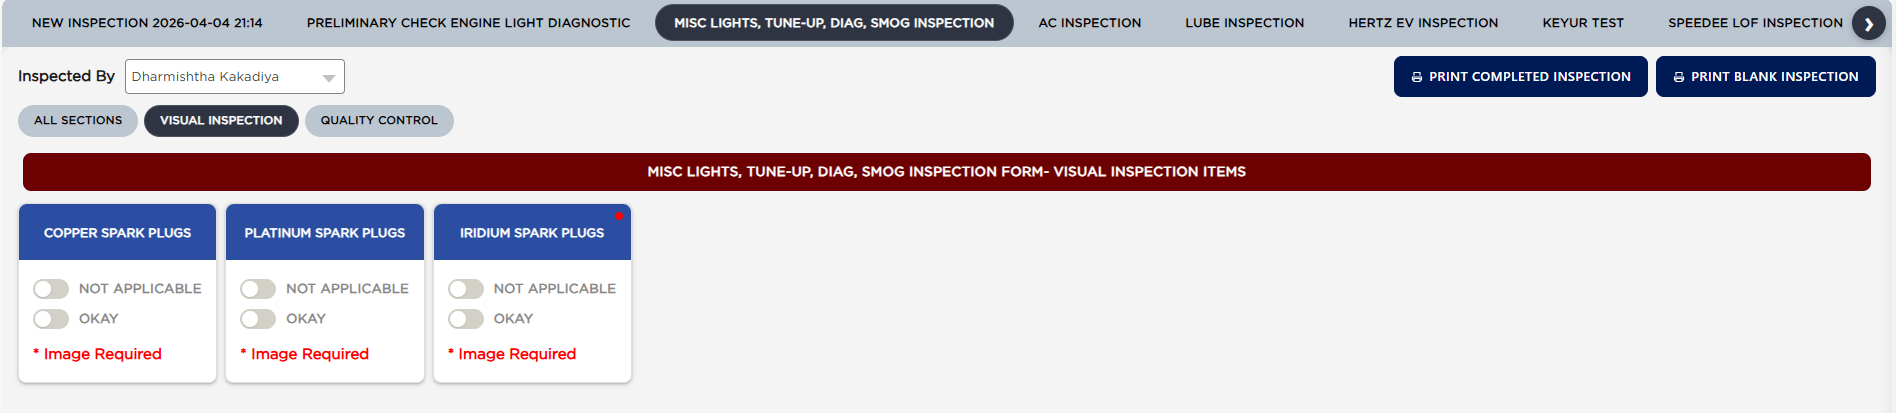
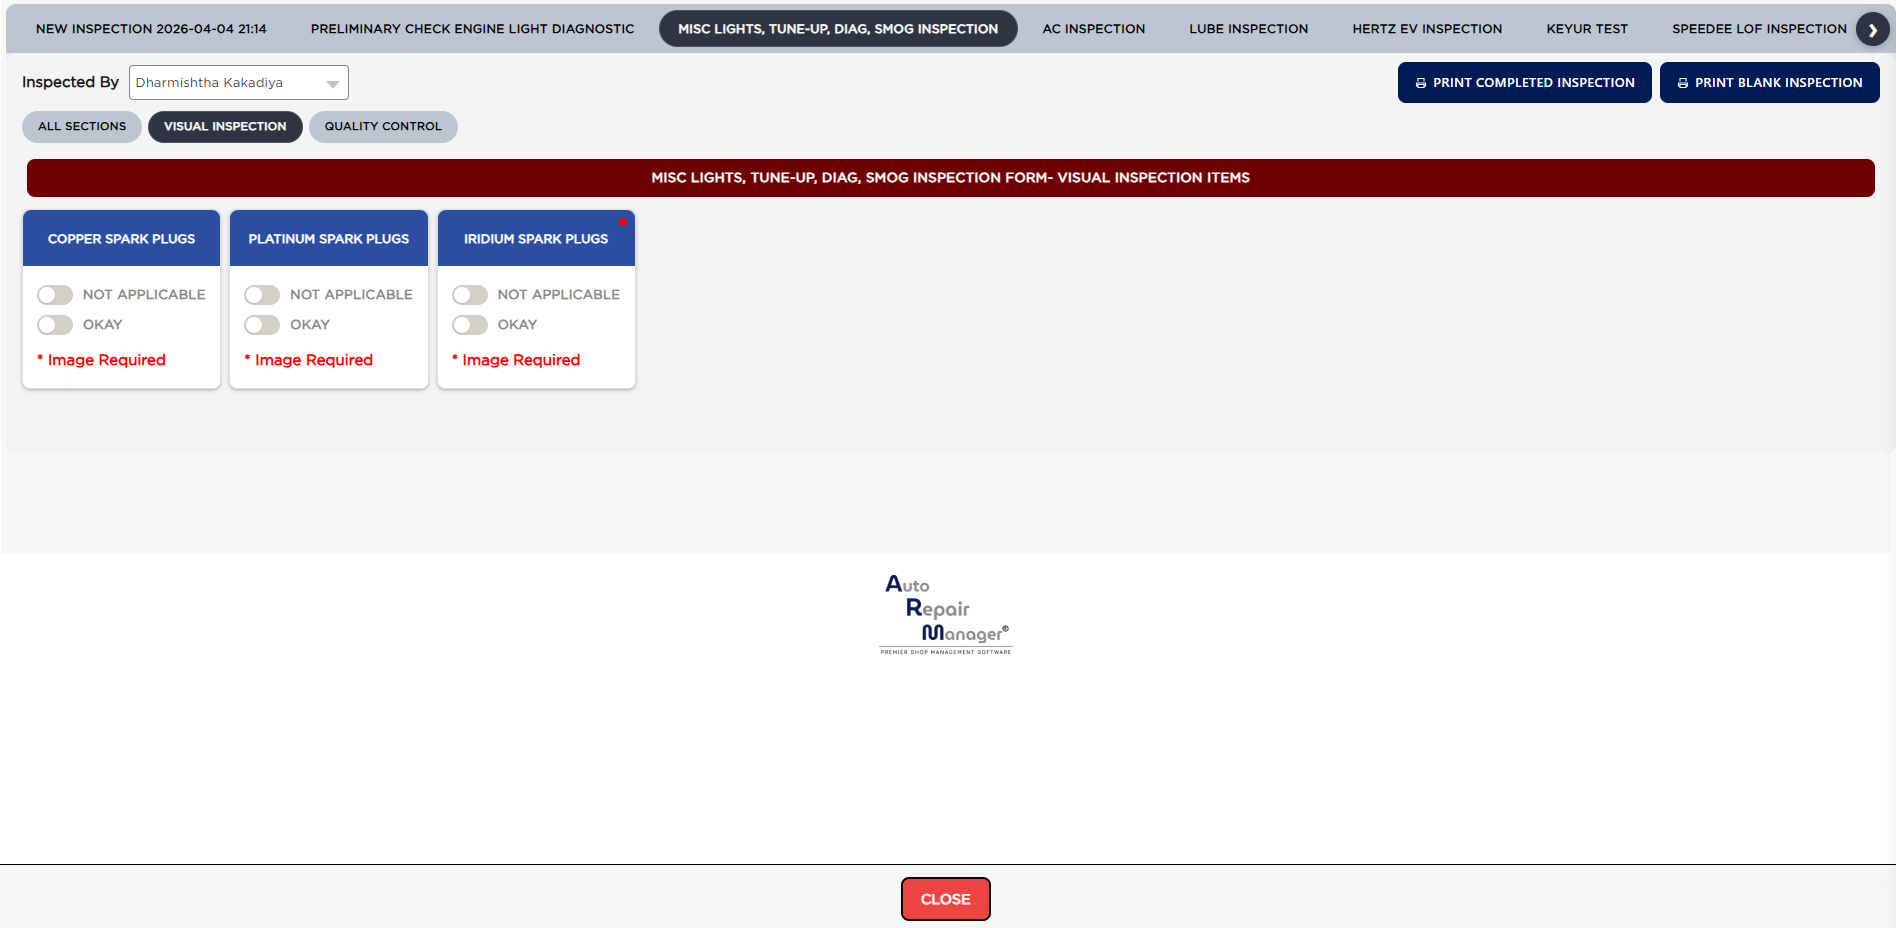
  2. Click the tab for the inspection you are doing, for example MISC LIGHTS, TUNE-UP, DIAG, SMOG INSPECTION. Use the › and ‹ arrows, or swipe, to reach tabs off the screen.
  3. Choose the technician in Inspected By. It is saved straight away for that tab and is filled in automatically as the employee on items that ask for one.
  4. PRINT COMPLETED INSPECTION prints this tab with its results; PRINT BLANK INSPECTION prints an empty copy to fill in by hand.
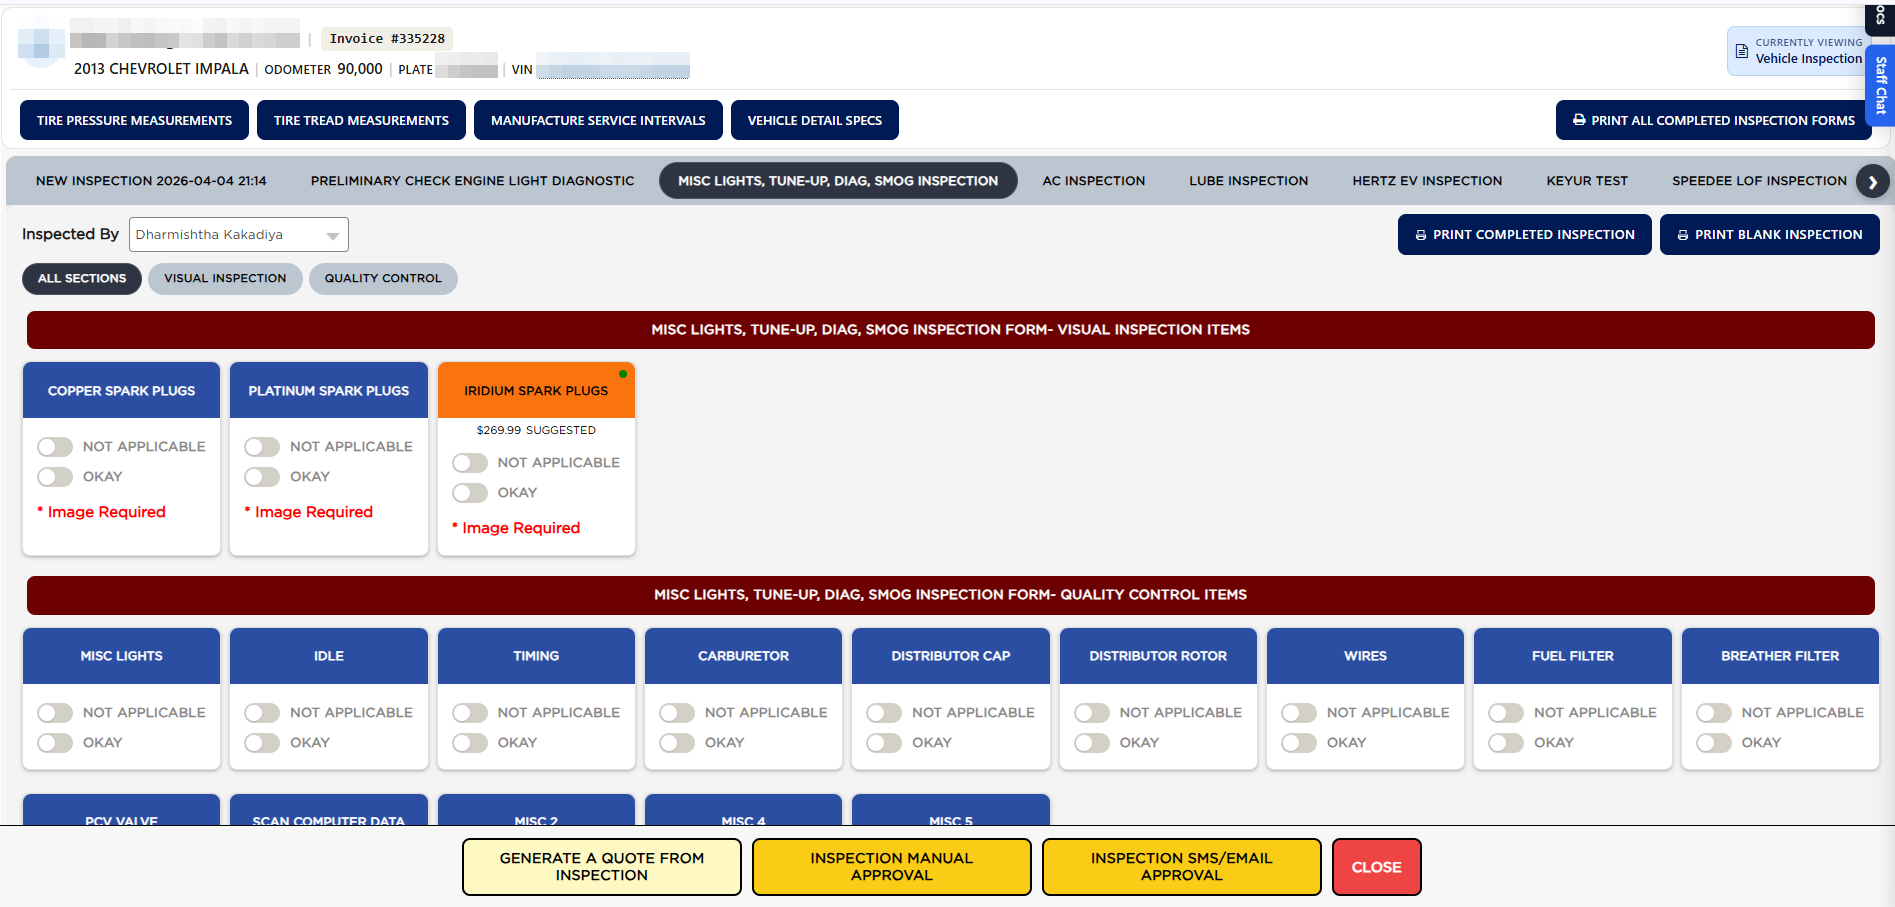
  5. Each form is split into sections, shown as maroon bars such as MISC LIGHTS, TUNE-UP, DIAG, SMOG INSPECTION FORM- VISUAL INSPECTION ITEMS. Click a section chip, for example VISUAL INSPECTION, to show only that section; ALL SECTIONS shows them all again.
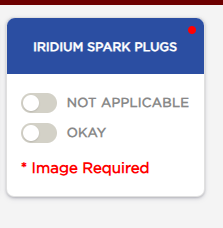
  6. Each item is a card with its statuses underneath. A small red dot in the corner marks an item that must be completed before the invoice can be finalized; it turns green once the item has any result. \* Image Required means a photo must be added when the item is marked.
  7. Cards start blue with every status off.
  8. Click a status, for example OKAY. It is saved at once: the card takes that status's colour and shows the status name under its title, and a red dot turns green.
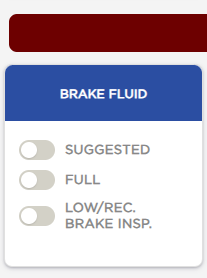
  9. Each item can offer its own statuses, set up for your store, for example SUGGESTED, FULL and LOW/REC. BRAKE INSP. on BRAKE FLUID. The colours are chosen by your store for each status; they do not have a fixed meaning.
  10. Until something is marked SUGGESTED or REQUIRED, the bar at the bottom shows only CLOSE.
Inspection tab with Inspected By, print buttons and section chips
Required item card with red dot and Image Required
Item cards before a status is chosen
Item card after OKAY
Card with custom statuses
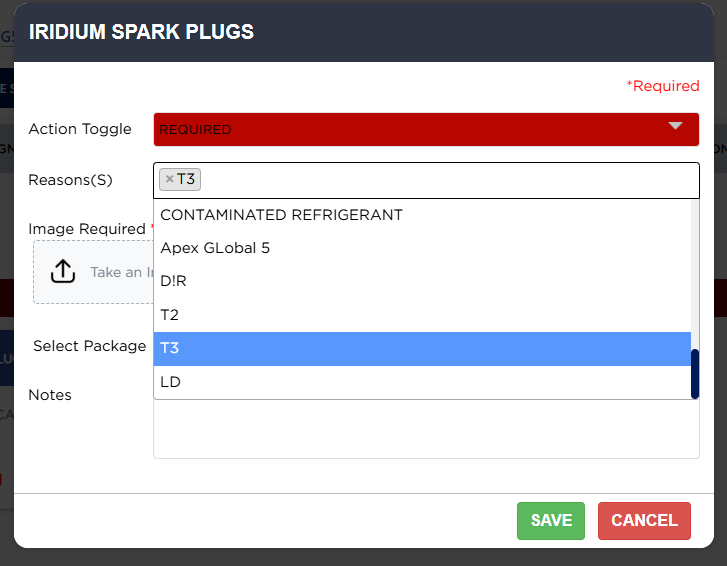
Item popup for REQUIRED with its own reasons
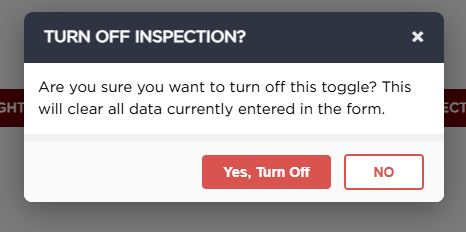
Turn Off Inspection prompt

How do I recommend work on an item? #

  1. From the Home Screen, click Invoices → Invoice List, open the invoice, click INSPECTION FORM and go to the tab.
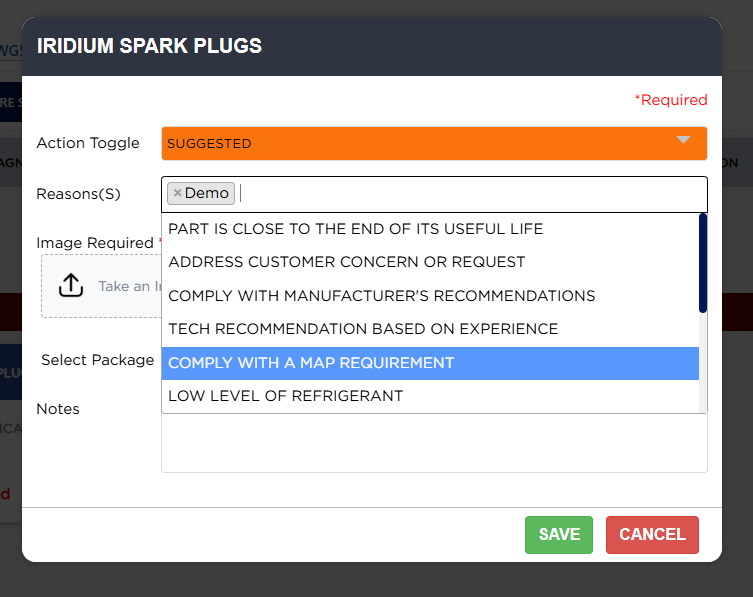
  2. Click SUGGESTED (work the customer should consider) or REQUIRED (work that needs doing) on the item. Its window opens, titled with the item name. It has no close button: use SAVE or CANCEL. Clicking any status also opens this window when the item needs a photo, an employee or other details.
  3. Action Toggle shows the status you chose, in its colour; you can change it here. Reasons(S) lists the reasons your store has set up for that status; your store's default reasons are already filled in. Click the box to add more, or the × on a reason to remove it. Reasons are optional.
  4. SUGGESTED and REQUIRED have separate reason lists, so the choices change when you switch the Action Toggle.
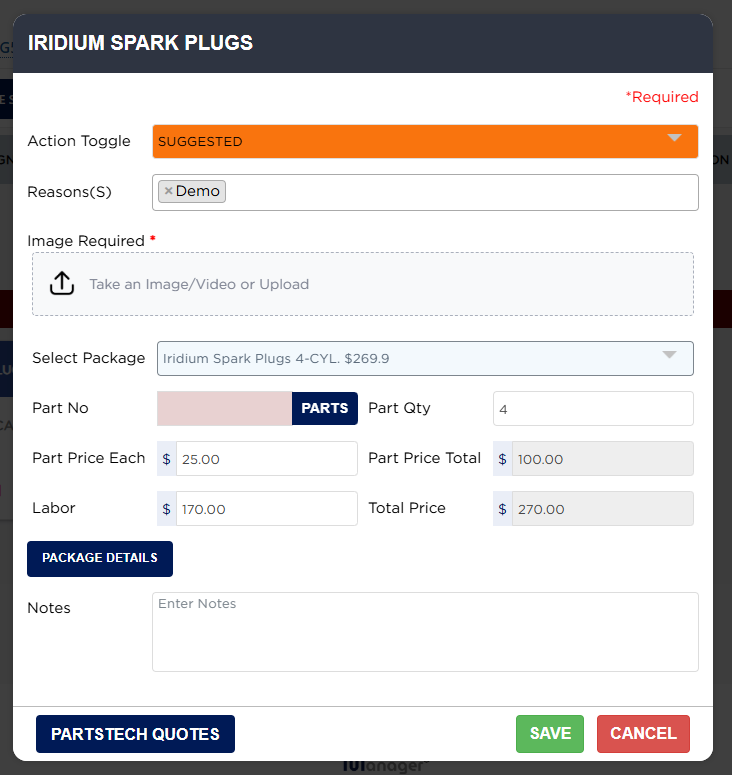
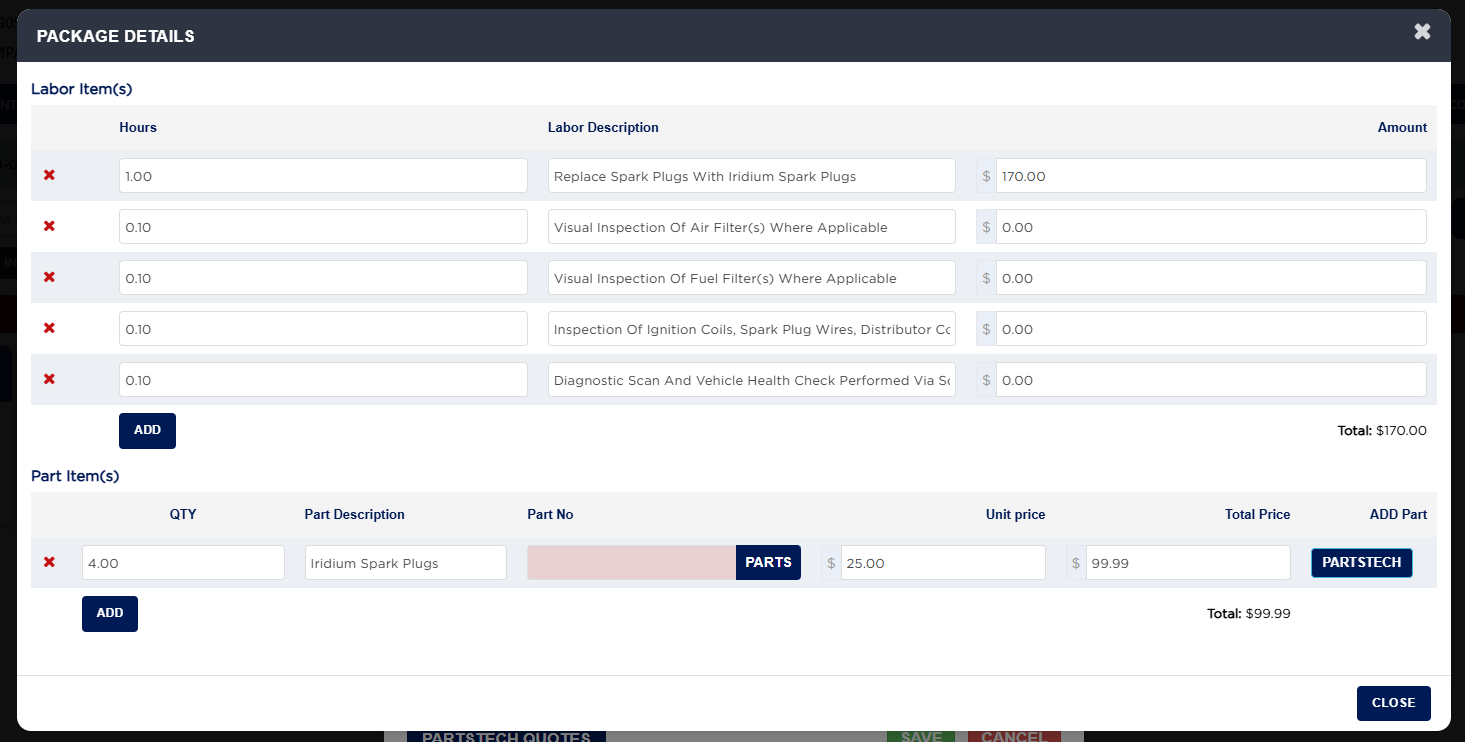
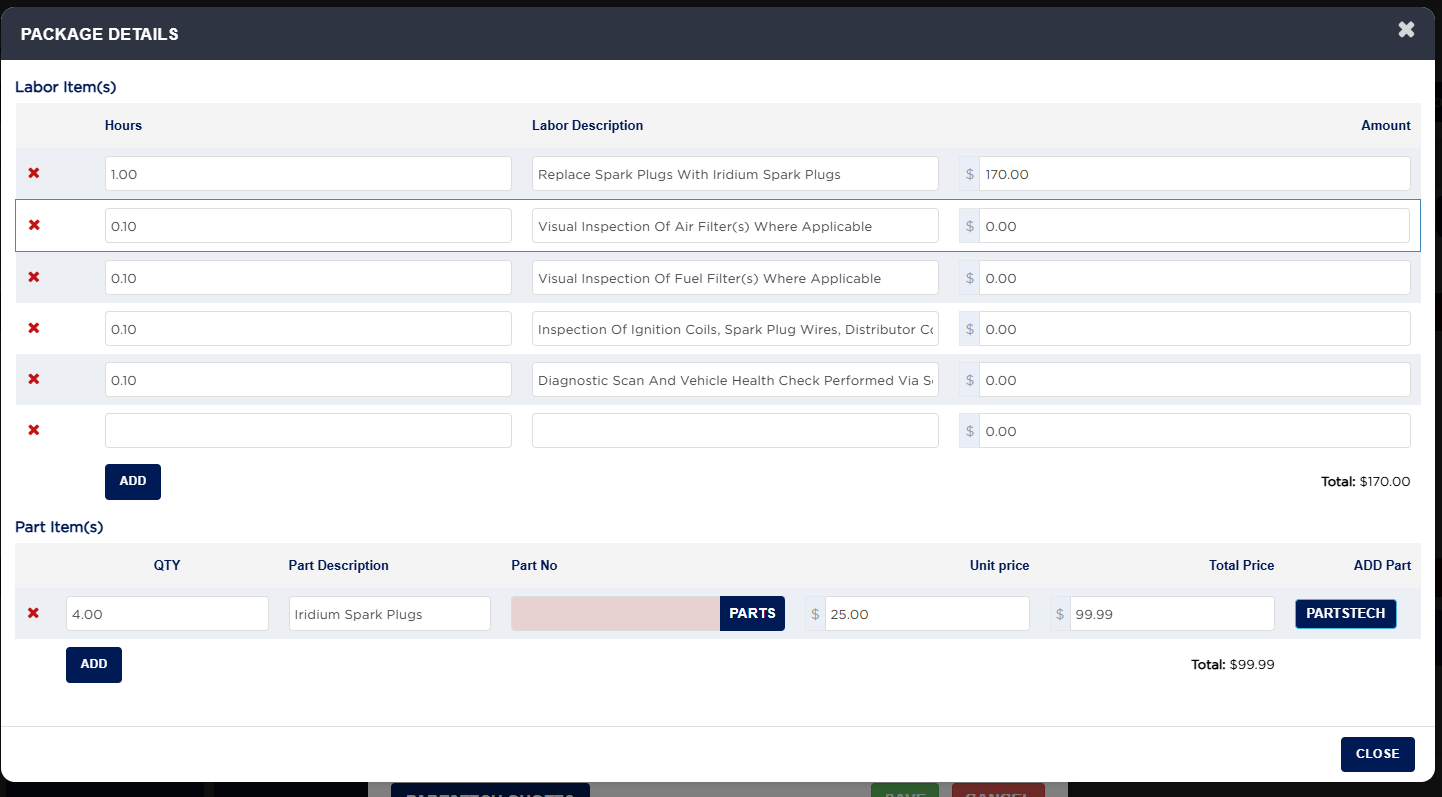
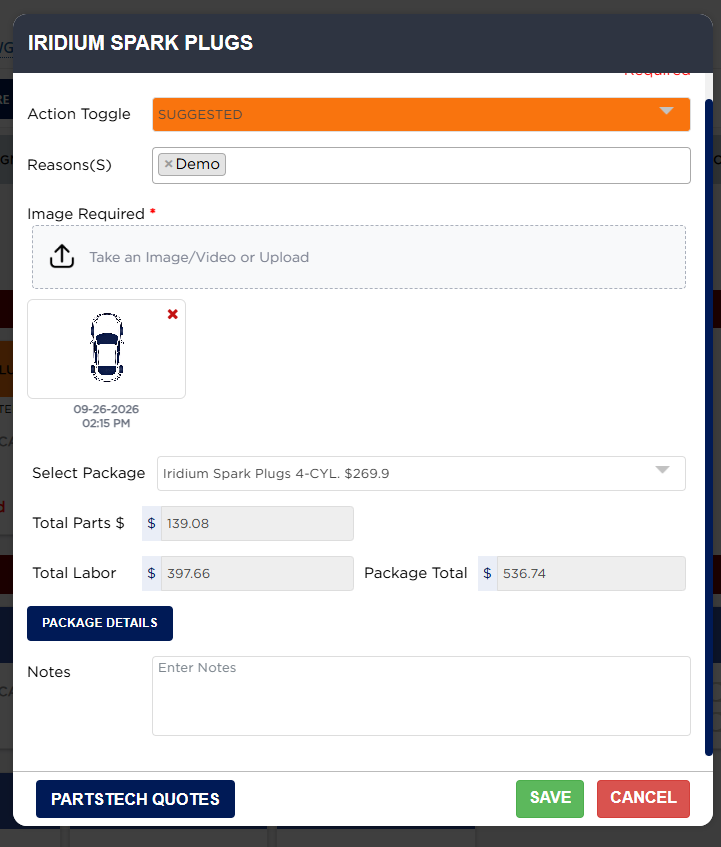
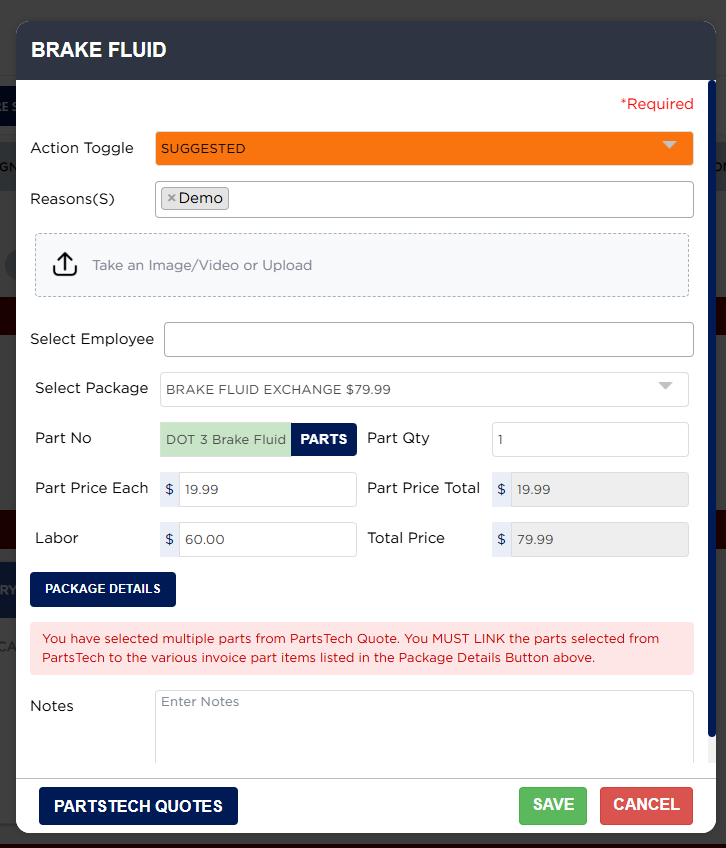
  5. In Select Package choose the service package that does the work, for example Iridium Spark Plugs 4-CYL. $269.9. If the item has only one package it is chosen for you. The price fields fill in from the package. For a package with one part and one labor line you see Part No, Part Qty, Part Price Each, Part Price Total, Labor and Total Price; you can change the quantity, price each and labor. The Part No box is green when the part is in stock and pink when it is not; PARTS opens your stock catalog to choose a part. PACKAGE DETAILS shows every labor and part line (see below), and PARTSTECH QUOTES gets parts and prices from your suppliers.
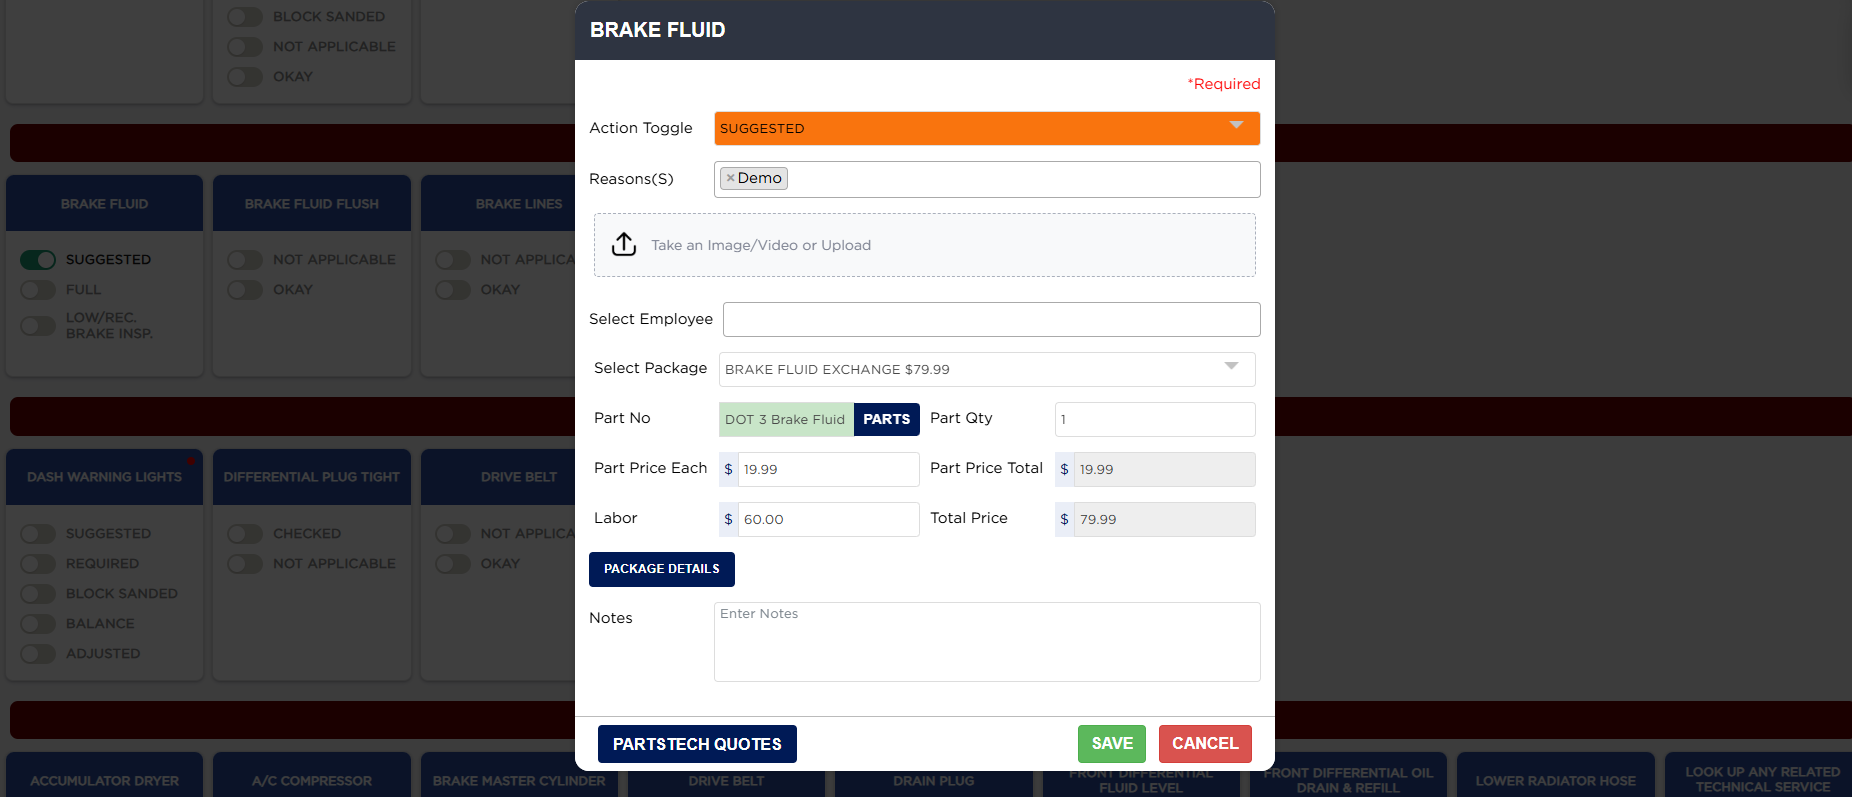
  6. If the item asks for it, choose who did the work in Select Employee (filled in from Inspected By on new items).
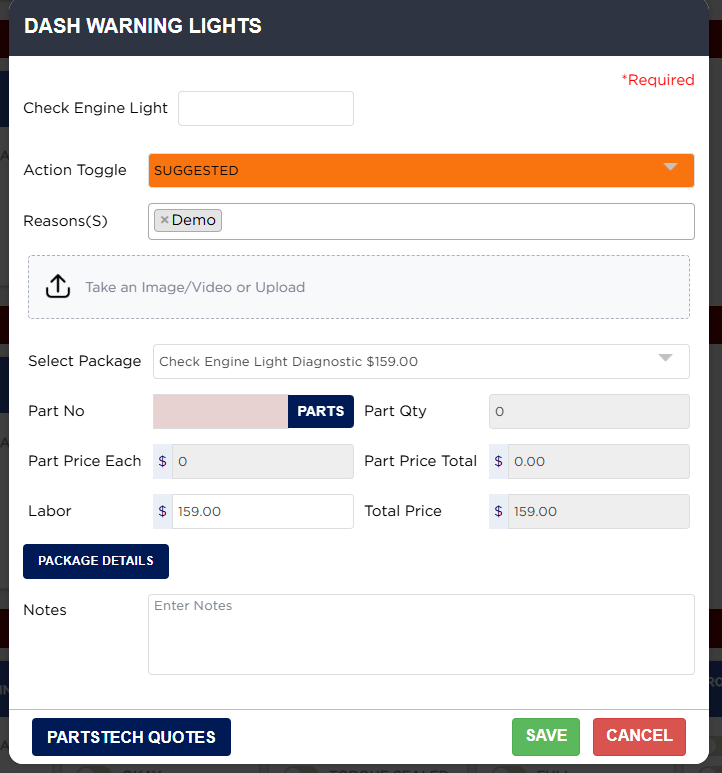
  7. Some items have extra fields set up by your store, for example Check Engine Light on DASH WARNING LIGHTS, or Cust. Input (Miles Ago / Months Ago / Don't Remember). Fields marked with a red \* must be filled in.
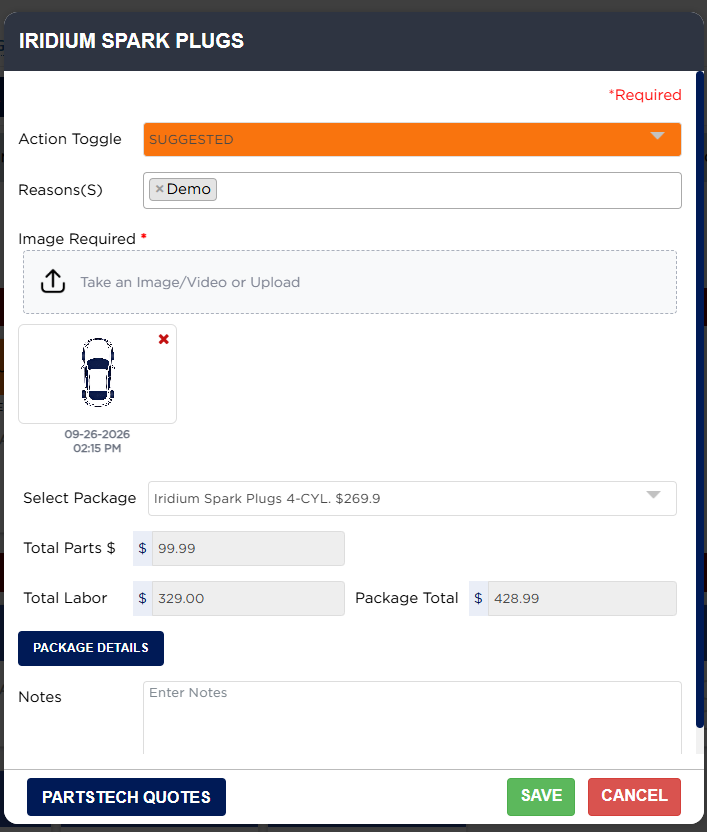
  8. To add a photo or video, click Take an Image/Video or Upload. Videos must be under 10 MB. Photos are uploaded when you click SAVE and appear with the date and time; the red × on a photo deletes it after you confirm "Are you sure want to delete image ?".
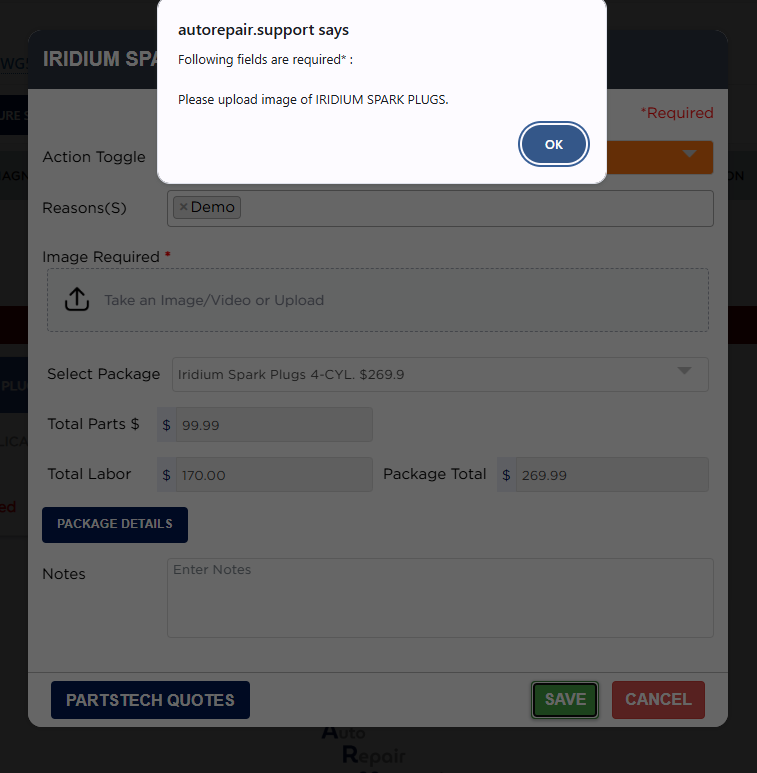
  9. Type any Notes for the customer and the invoice, then click SAVE. If something required is missing, ARM lists it, for example "Following fields are required\* : Please upload image of IRIDIUM SPARK PLUGS." Fill it in and save again.
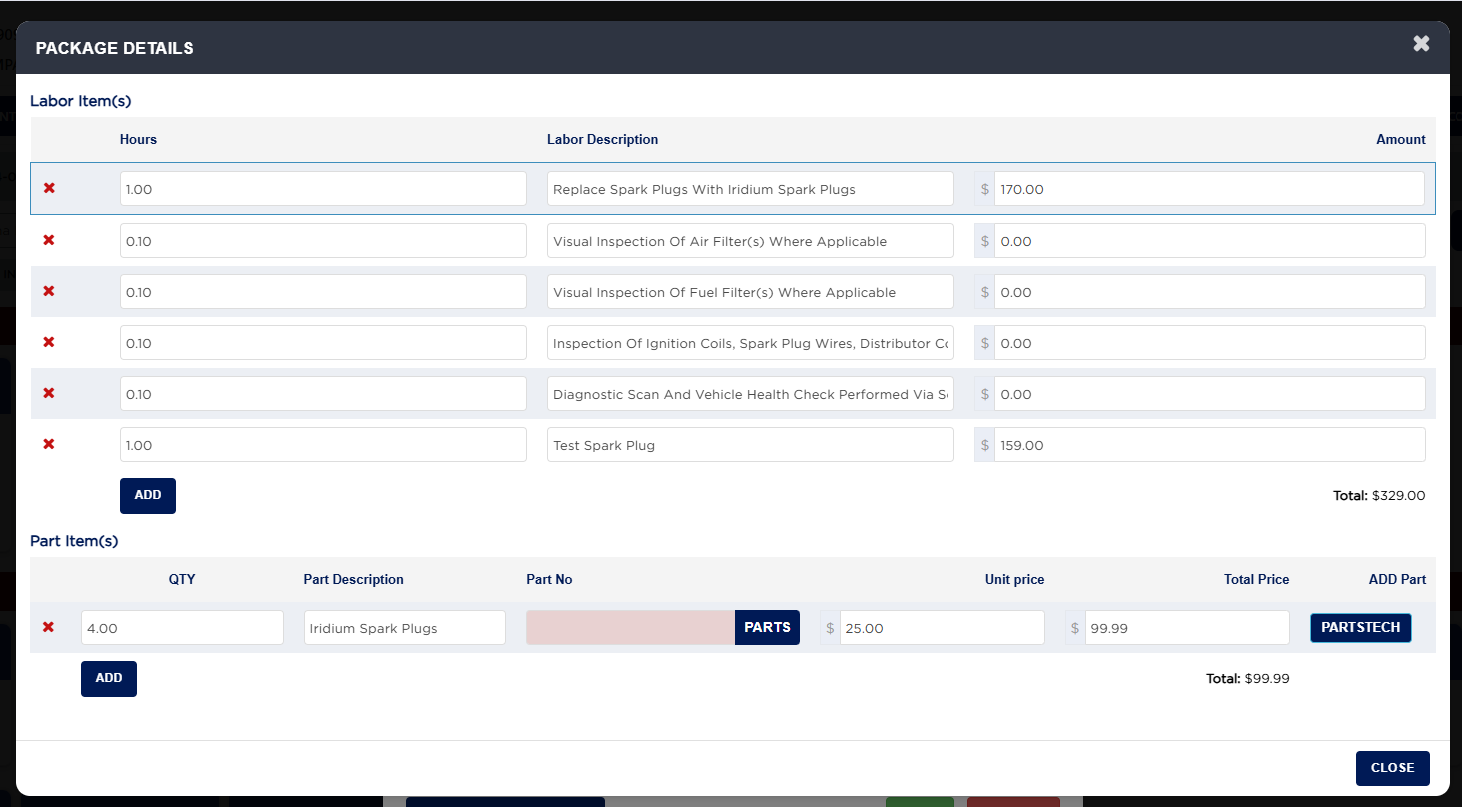
  10. When a package has more than one labor or part line, the window shows Total Parts $, Total Labor and Package Total instead of the single-part fields. For example, parts $99.99 plus labor $329.00 gives a Package Total of $428.99.
  11. After saving, the card turns the status colour and shows the price and status, for example $269.99 SUGGESTED. The price is parts plus labor, before fees and tax. As soon as one item is SUGGESTED or REQUIRED, the bar at the bottom adds GENERATE A QUOTE FROM INSPECTION, INSPECTION MANUAL APPROVAL and INSPECTION SMS/EMAIL APPROVAL. Technicians do not see these three buttons.
Footer with only the Close button
Item popup opened from SUGGESTED with the Reasons list
Item popup with a package selected in single view
Item popup with Select Employee and an in-stock part
Item popup with a custom field
Following fields are required alert
Item popup with a photo added and package totals
Card after saving with price and the footer approval buttons
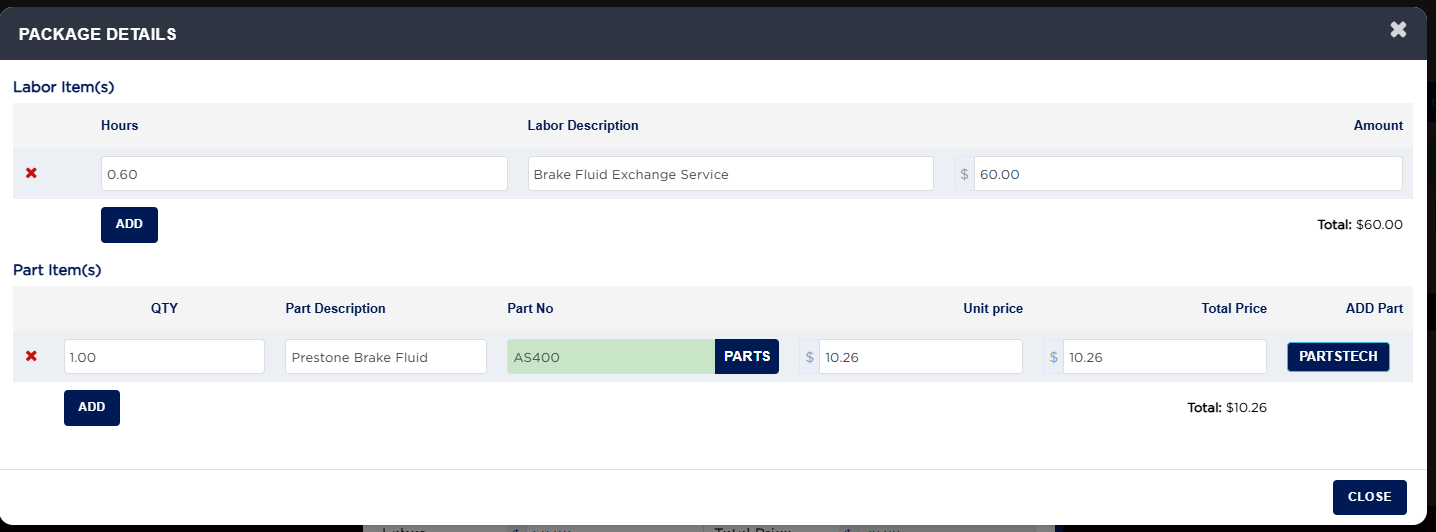
PACKAGE DETAILS window
PACKAGE DETAILS after Add on labor
PACKAGE DETAILS with a labor line added
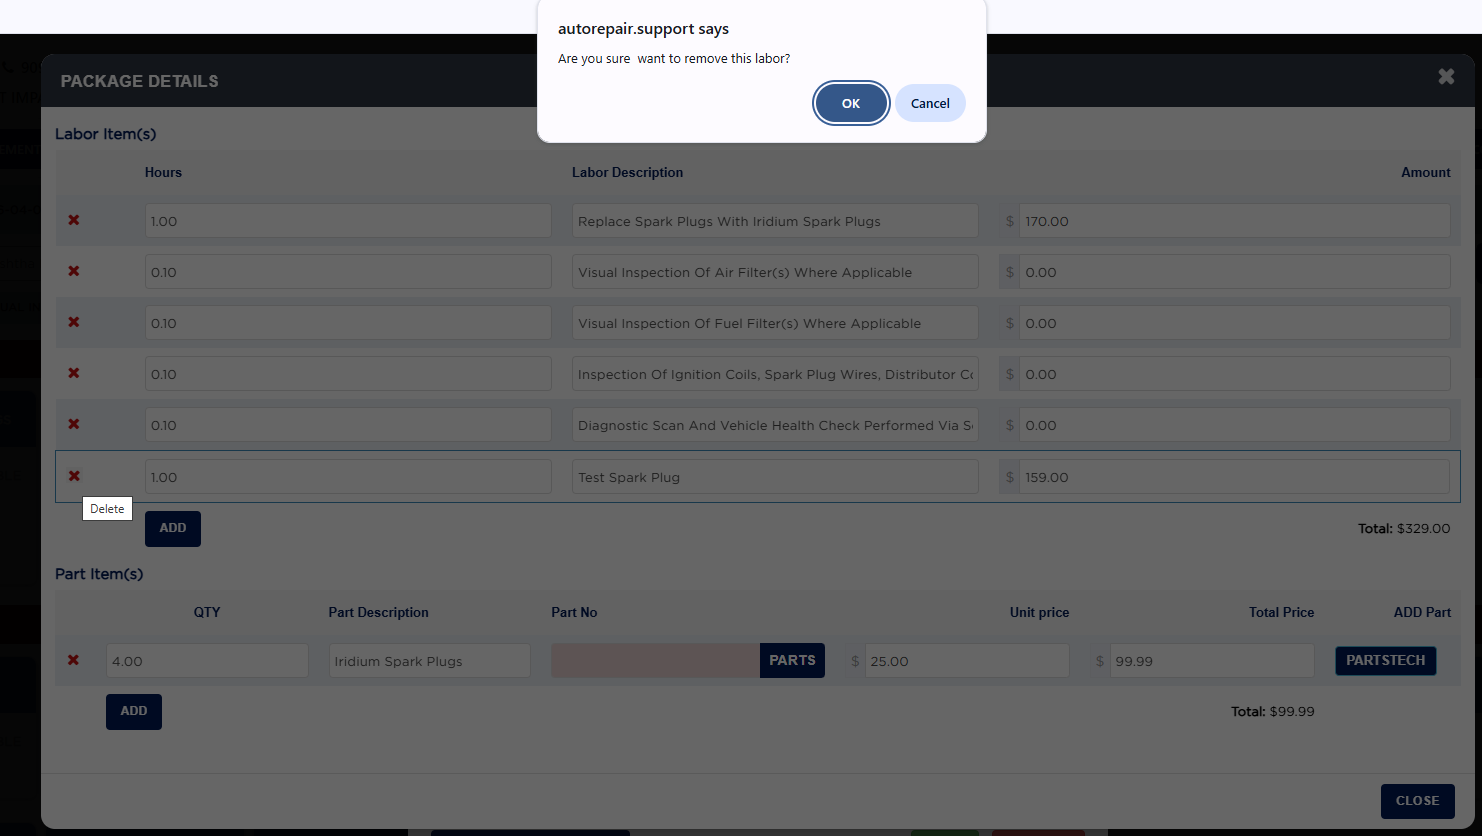
Remove labor prompt
Remove labor prompt
PACKAGE DETAILS for a one-part package
PartsTech labor for the chosen part
PACKAGE DETAILS after one PartsTech part came back
Item popup totals after PartsTech
Item popup with the MUST LINK warning
PACKAGE DETAILS after linking one PartsTech part
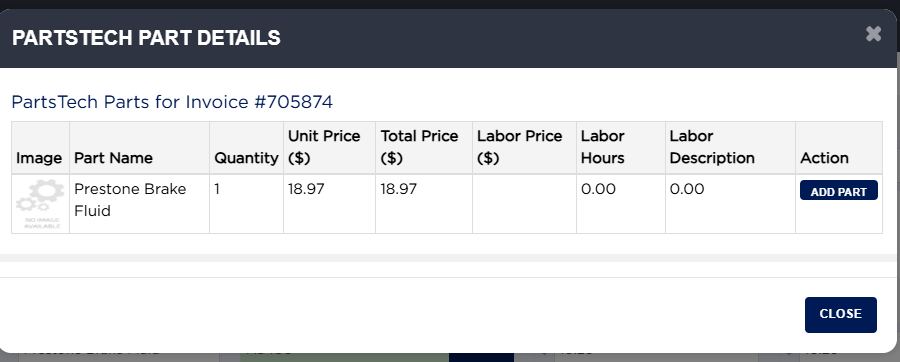
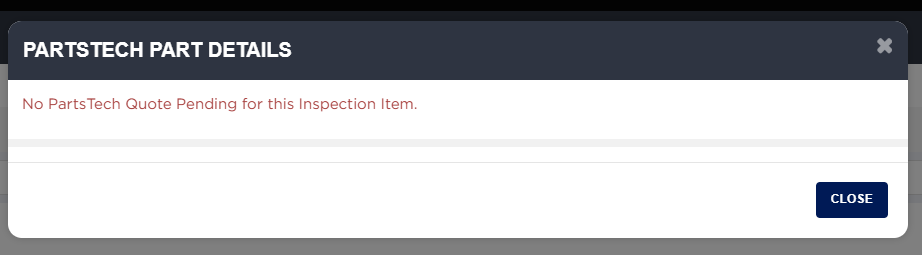
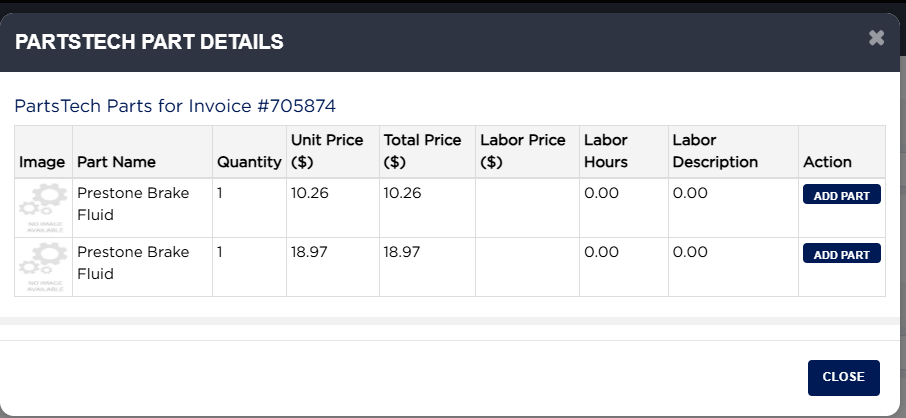
PartsTech Part Details with the remaining part
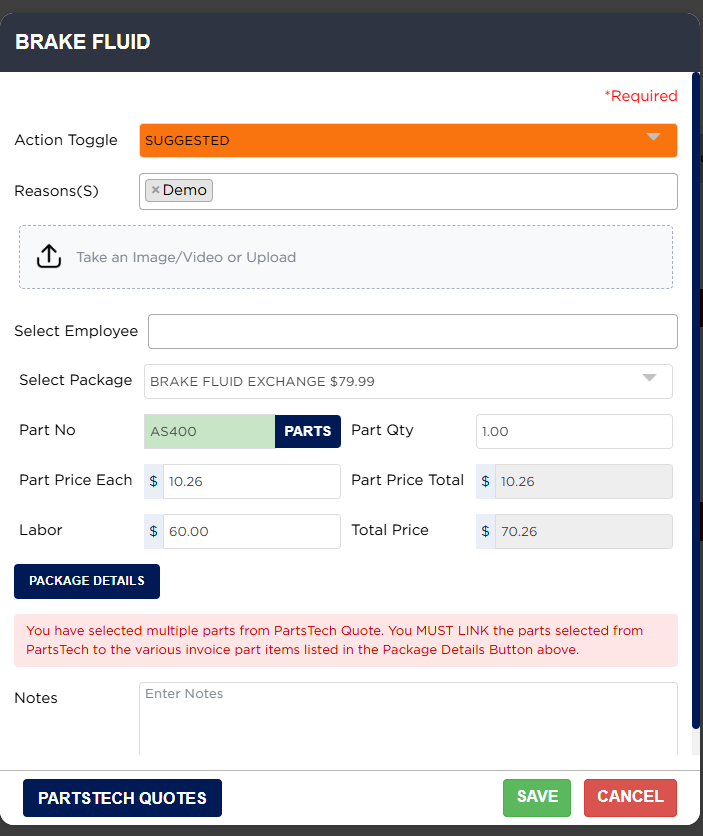
Item popup after linking
Invoice after approval with the labor line added
Customer approval success screen
Manual approval list after the customer responded

How do I turn a status off? #

  1. From the Home Screen, click Invoices → Invoice List, open the invoice, click INSPECTION FORM and go to the tab.
  2. Click the status that is already on.
  3. For SUGGESTED and REQUIRED, and for items with required details, ARM asks "Turn Off Inspection?" — "Are you sure you want to turn off this toggle? This will clear all data currently entered in the form." Click Yes, Turn Off to clear it or NO to keep it. Other statuses turn off without asking.

How do I get parts and prices from PartsTech? #

  1. From the Home Screen, click Invoices → Invoice List, open the invoice, click INSPECTION FORM, mark the item SUGGESTED or REQUIRED and choose its package. The PARTSTECH QUOTES button appears once a package is chosen, when your store is connected to PartsTech.
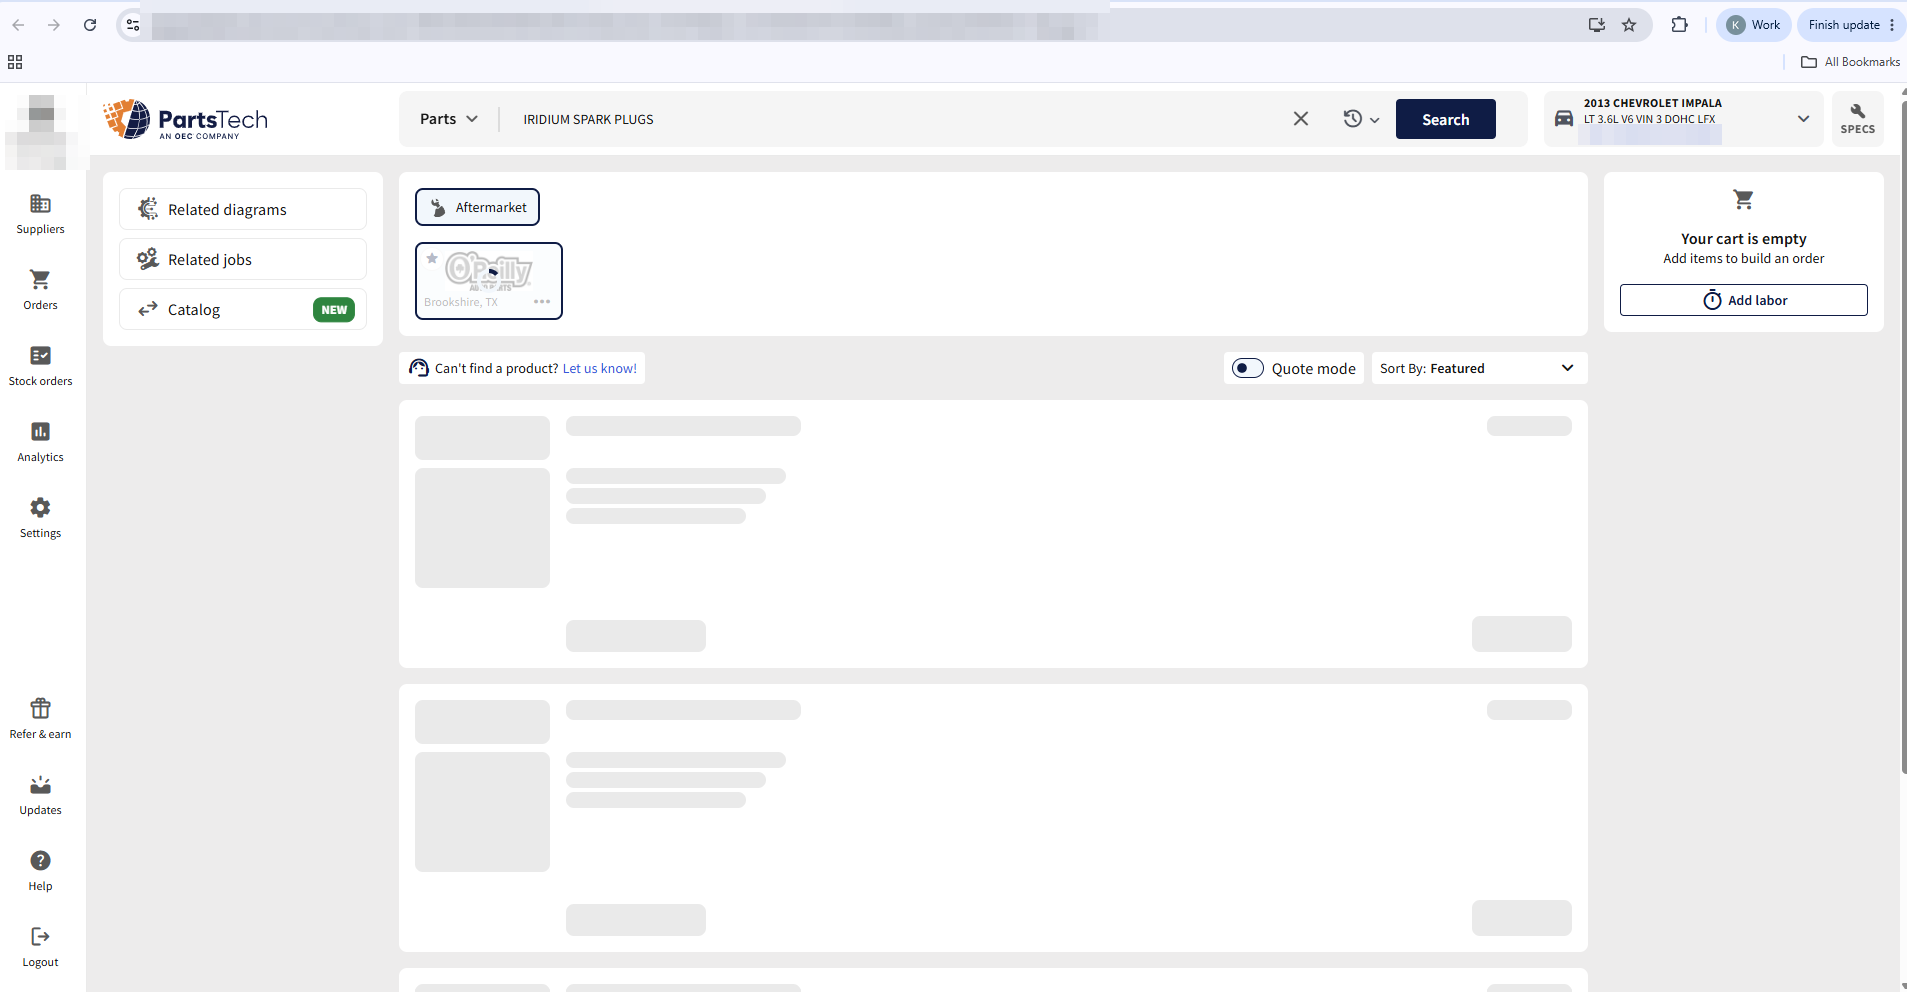
  2. Click PARTSTECH QUOTES. If your store protects PartsTech quotes with a password, enter it. ARM saves the item and opens PartsTech in a new browser tab, with the vehicle already selected and a search for the item, for example IRIDIUM SPARK PLUGS.
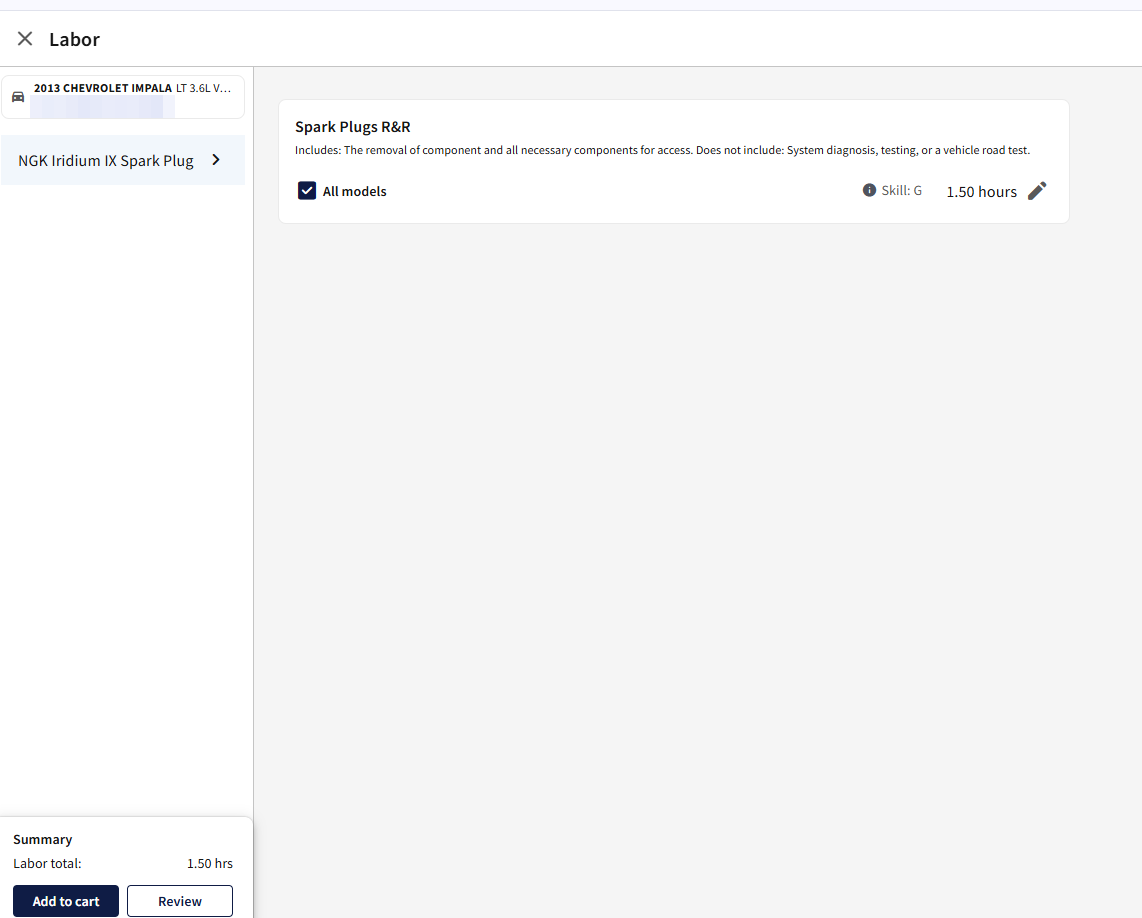
  3. Choose the part from your suppliers and set the quantity. To bring labor with it, click Add labor, tick the labor job and click Add to cart.
  4. Check the cart. The PO Number is the invoice number. Click Submit quote. This only sends a quote back to ARM; nothing is ordered from the supplier yet.
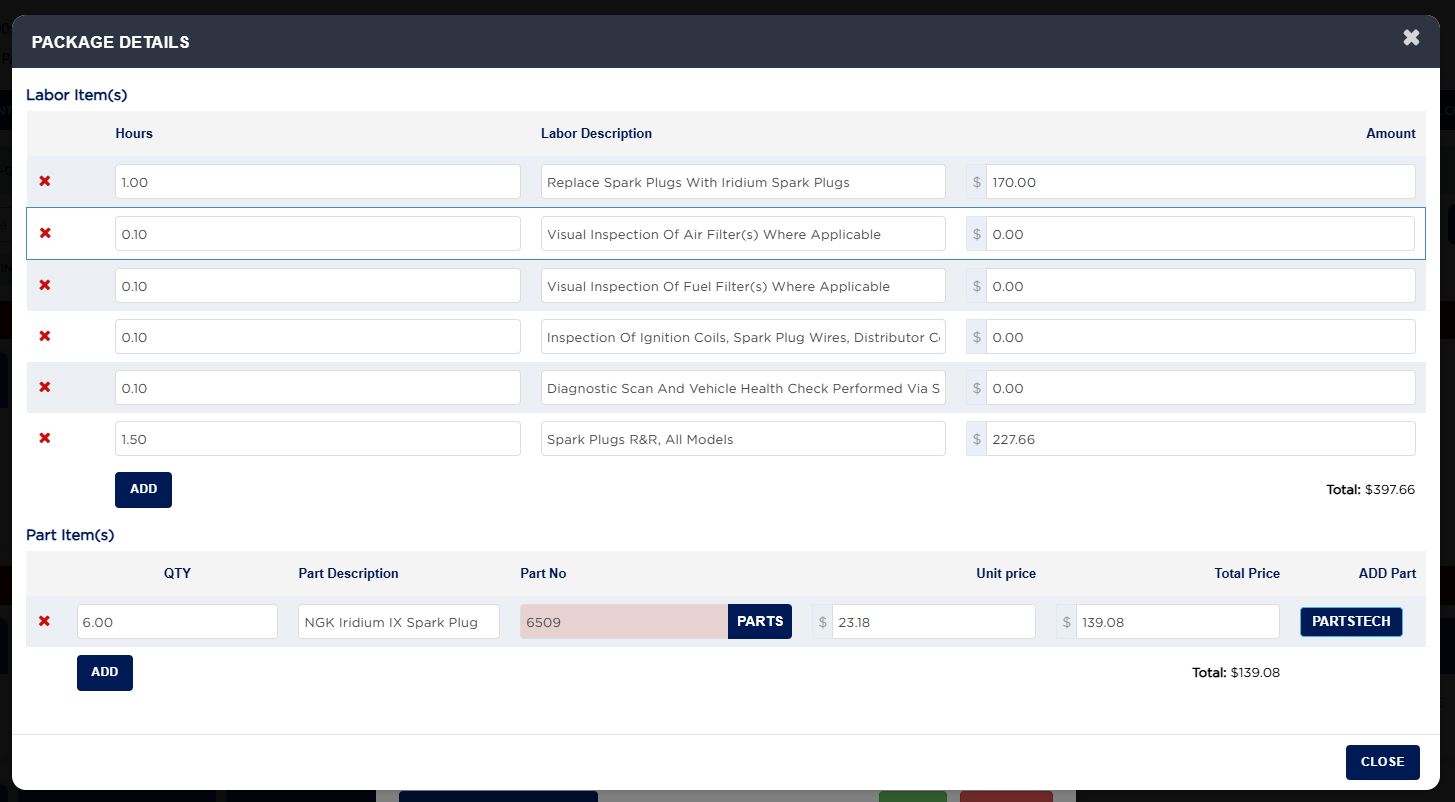
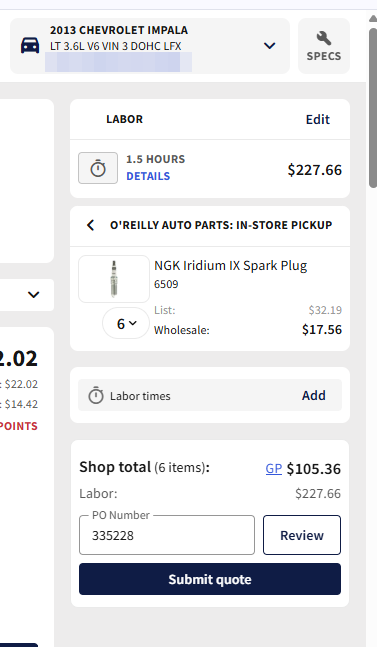
  5. PartsTech returns you to the inspection and reopens the item. When the package has one part and PartsTech sent back one part, ARM links it for you: the part line takes the PartsTech part, quantity and price, and the PartsTech labor is added to the labor lines. Example: 6 × NGK Iridium IX Spark Plug 6509 at $17.56 wholesale comes back as 6 × $23.18 = $139.08 (your store's price matrix is applied to the supplier cost; without a matrix the supplier's retail price is used), and the PartsTech labor, 1.50 hours $227.66, is added as a new labor line.
  6. The item window shows the new totals: parts $139.08 plus labor $170.00 + $227.66 = $397.66 gives a Package Total of $536.74. Click SAVE.
PartsTech opened in a new tab with the vehicle selected
PartsTech cart before Submit quote
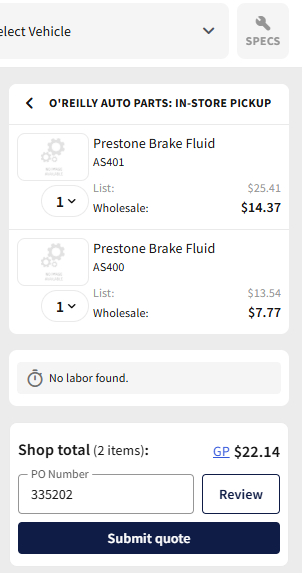
PartsTech cart with two parts

How do I turn the inspection into a quote? #

  1. From the Home Screen, click Invoices → Invoice List, open the invoice and click INSPECTION FORM.
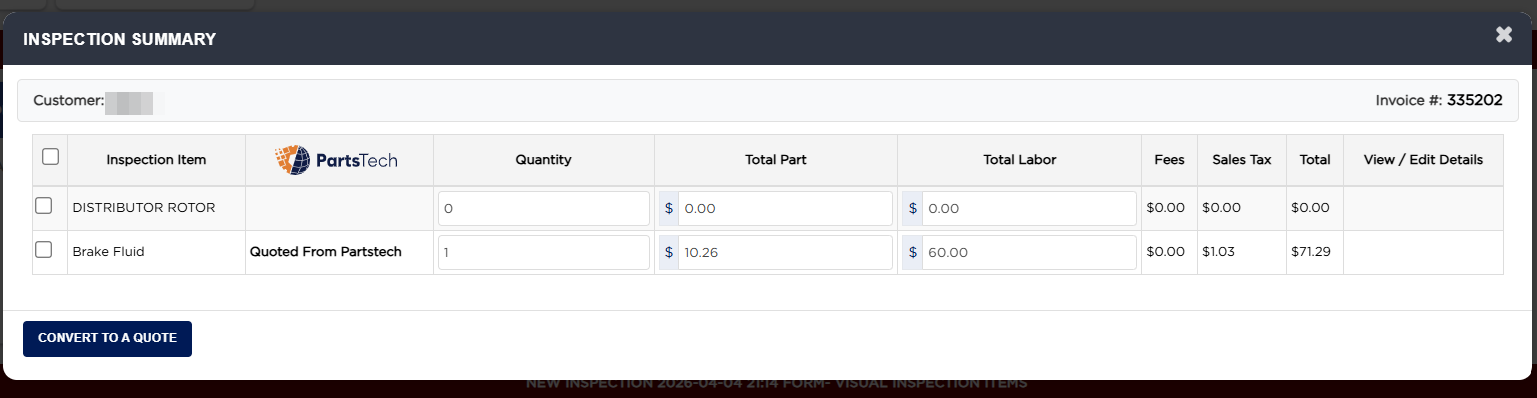
  2. Click GENERATE A QUOTE FROM INSPECTION. Inspection Summary lists the recommended items with Quantity, Total Part, Total Labor, Fees, Sales Tax and Total; Quoted From Partstech marks items priced from PartsTech. Nothing is ticked yet. Example: Brake Fluid, part $10.26 + labor $60.00 + sales tax $1.03 = $71.29.
  3. Tick the items for the quote (the box in the heading ticks them all) and click CONVERT TO A QUOTE. With nothing ticked ARM says "Please select at least one item to convert to a quote."
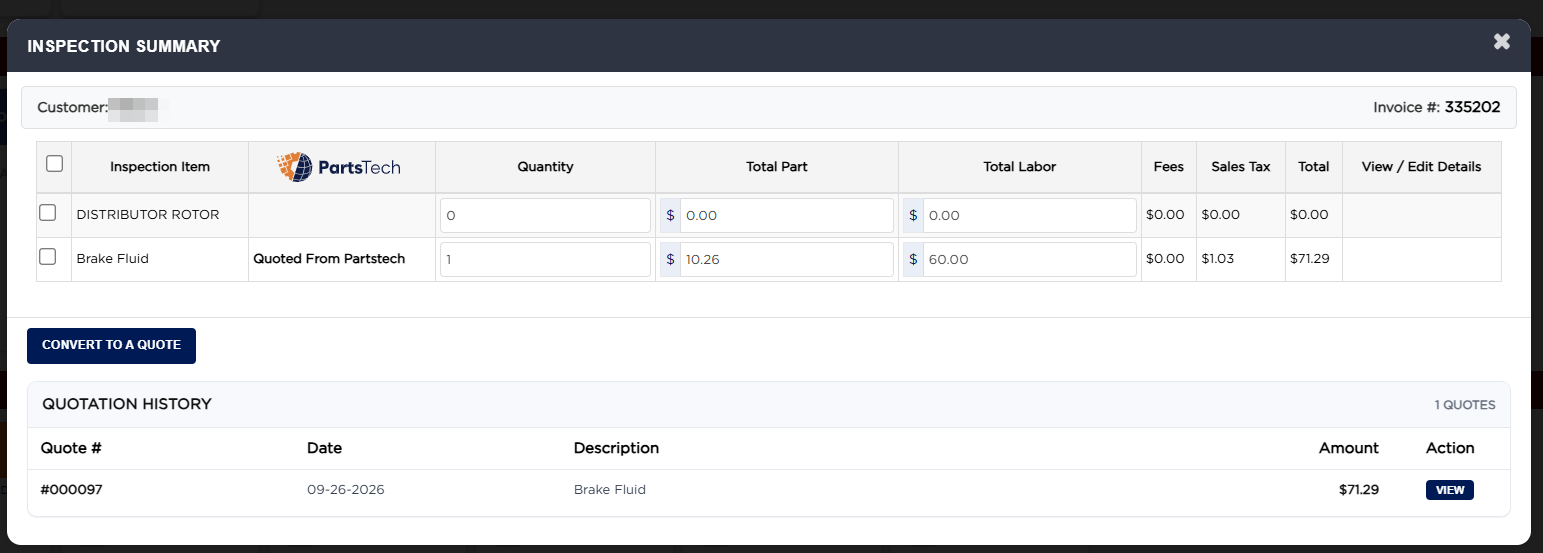
  4. The quote is created without a message and you stay on the inspection. It appears under QUOTATION HISTORY with its Quote #, Date, Description (the items) and Amount, for example #000097, Brake Fluid, $71.29. The items keep their status on the inspection, so you can still get them approved. Each click of CONVERT TO A QUOTE makes another quote.
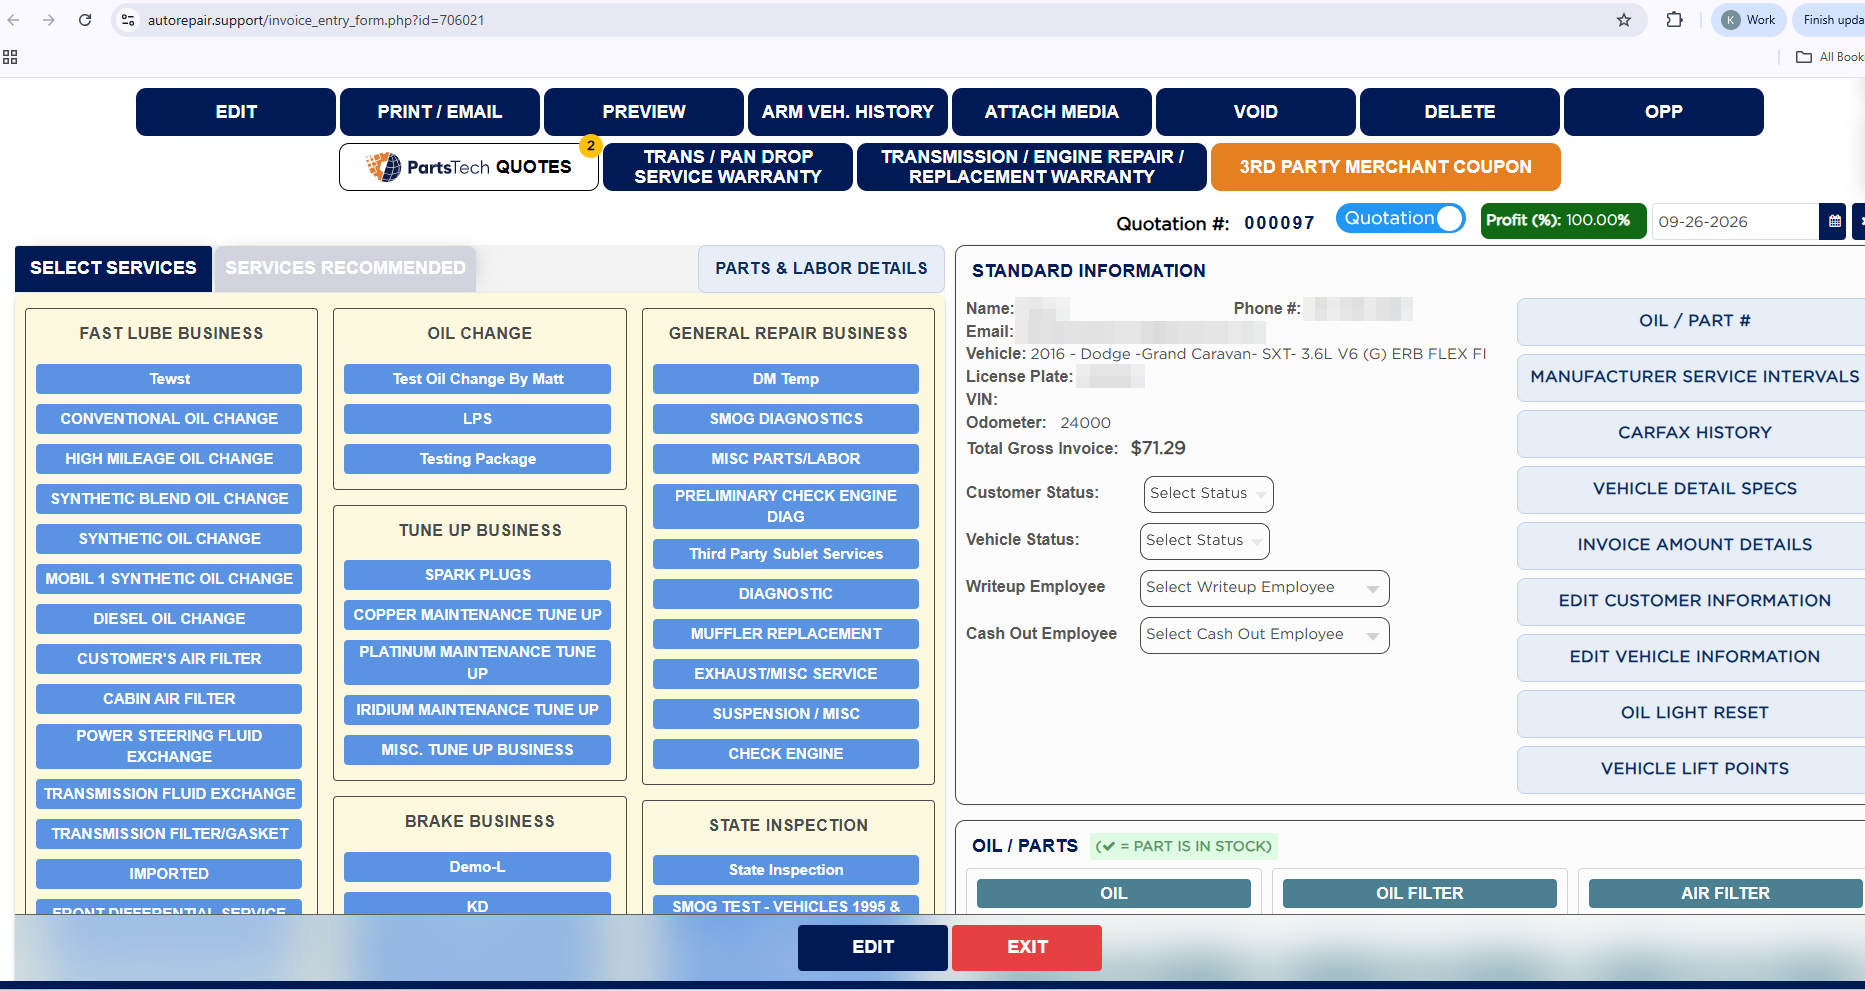
  5. Click VIEW to open the quote. It opens in invoice entry with Quotation # and the Quotation switch; use PRINT / EMAIL to print it or send it to the customer. The original invoice shows an ARM QUOTE Invoice button with the number of quotes. To turn the quote into an invoice later, use the Quotation switch.
Inspection Summary pick-list for a quote
Quotation History after Convert To A Quote
Quote opened in invoice entry

How do I record the customer's approval in the shop? #

  1. From the Home Screen, click Invoices → Invoice List, open the invoice and click INSPECTION FORM.
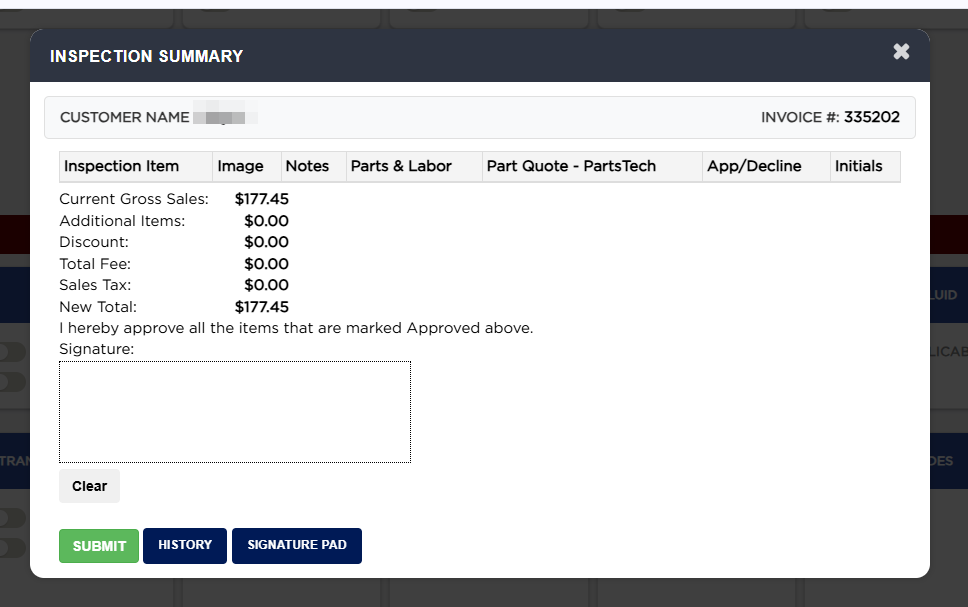
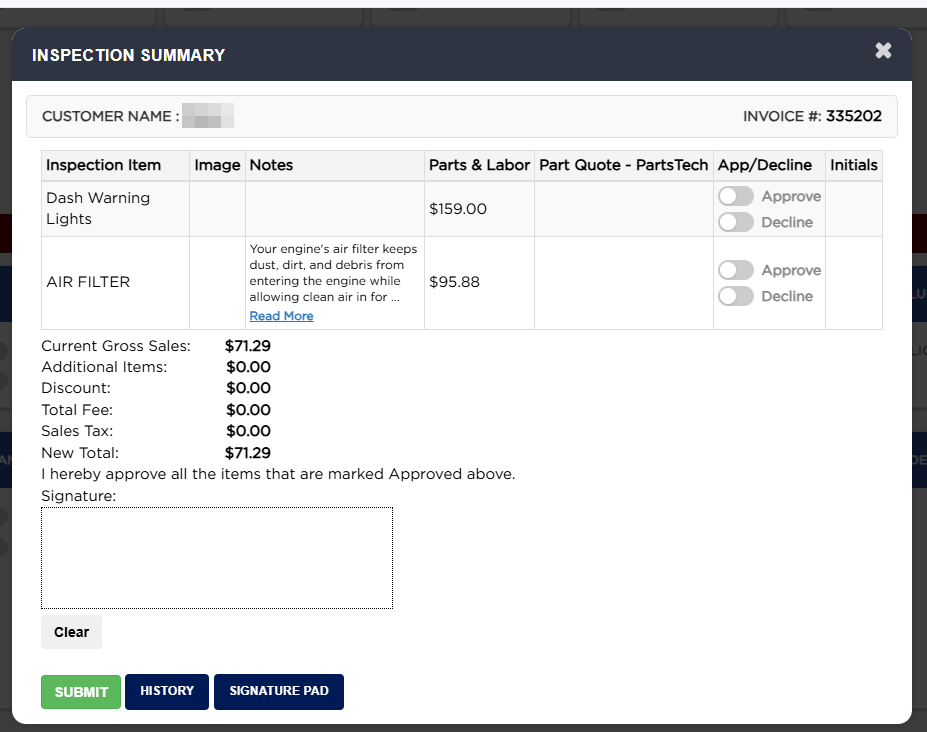
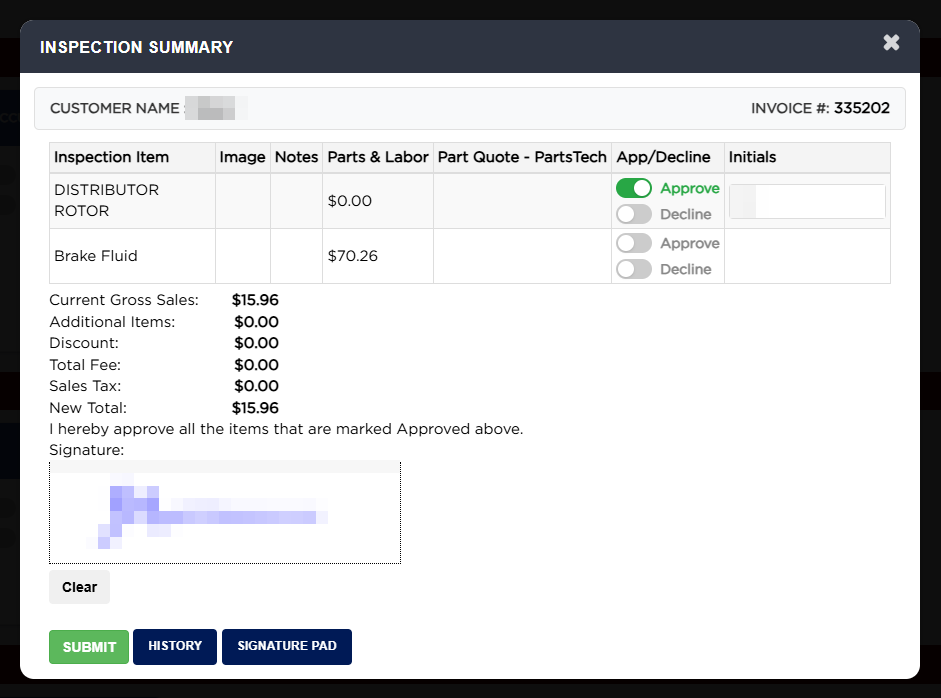
  2. Click INSPECTION MANUAL APPROVAL. Inspection Summary lists every recommended item with Image, Notes, Parts & Labor (its price), Part Quote - PartsTech, App/Decline and Initials, and the totals: Current Gross Sales, Additional Items, Discount, Total Fee, Sales Tax and New Total.
  3. Long notes are cut short; click Read More to read them in full in Inspection Note, then CLOSE.
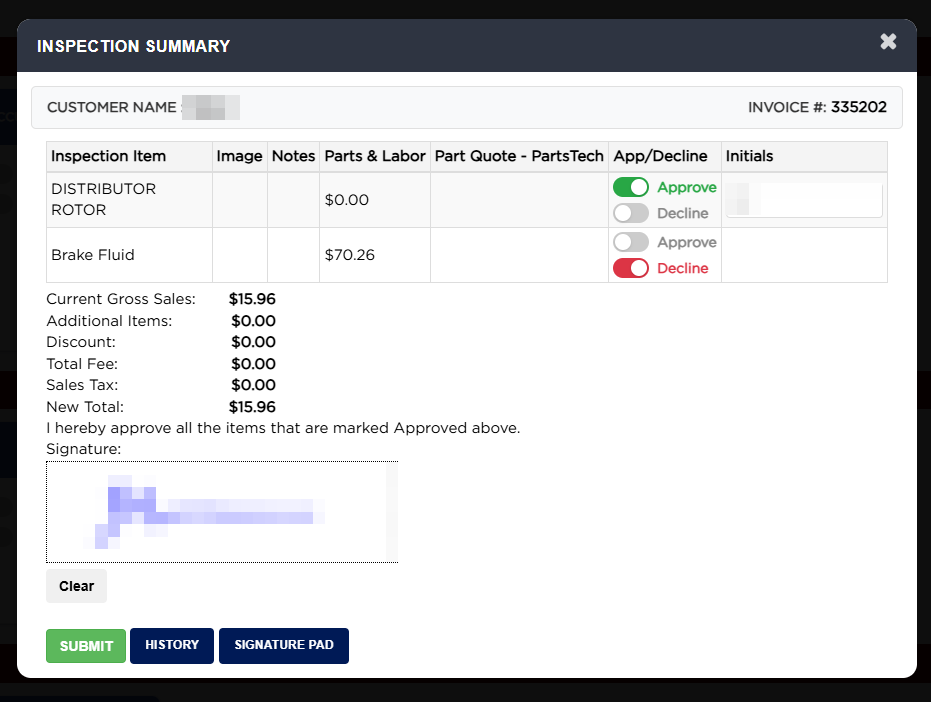
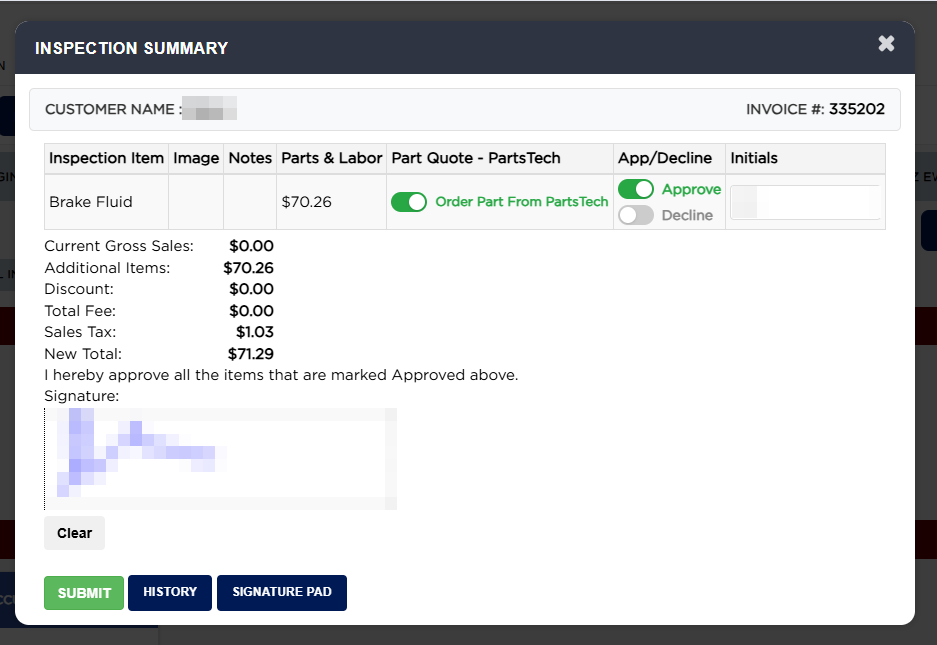
  4. For each item switch on Approve or Decline. Approving an item opens its Initials box for the customer's initials, and adds the item to the totals.
  5. The customer signs in the Signature box under "I hereby approve all the items that are marked Approved above." (Clear starts again, SIGNATURE PAD uses a Topaz signature pad). A signature is needed when anything is approved: "Please provide your digital signature."
  6. Declined items are not added to the totals.
  7. For an item priced from PartsTech, Order Part From PartsTech appears once the item is approved. Leave it on to order the part from the supplier when you submit; switch it off if you will buy the part another way. Example: approving Brake Fluid adds $70.26 of items plus $1.03 sales tax, a New Total of $71.29.
  8. Click SUBMIT. The page reloads; there is no message. HISTORY shows earlier approvals with their signatures.
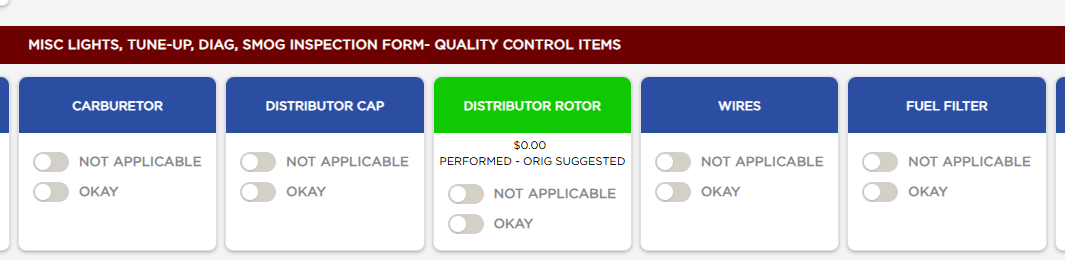
  9. Approved items now show PERFORMED - ORIG SUGGESTED or PERFORMED - ORIG REQUIRED on their cards. Declined items stay SUGGESTED or REQUIRED and can be approved later.
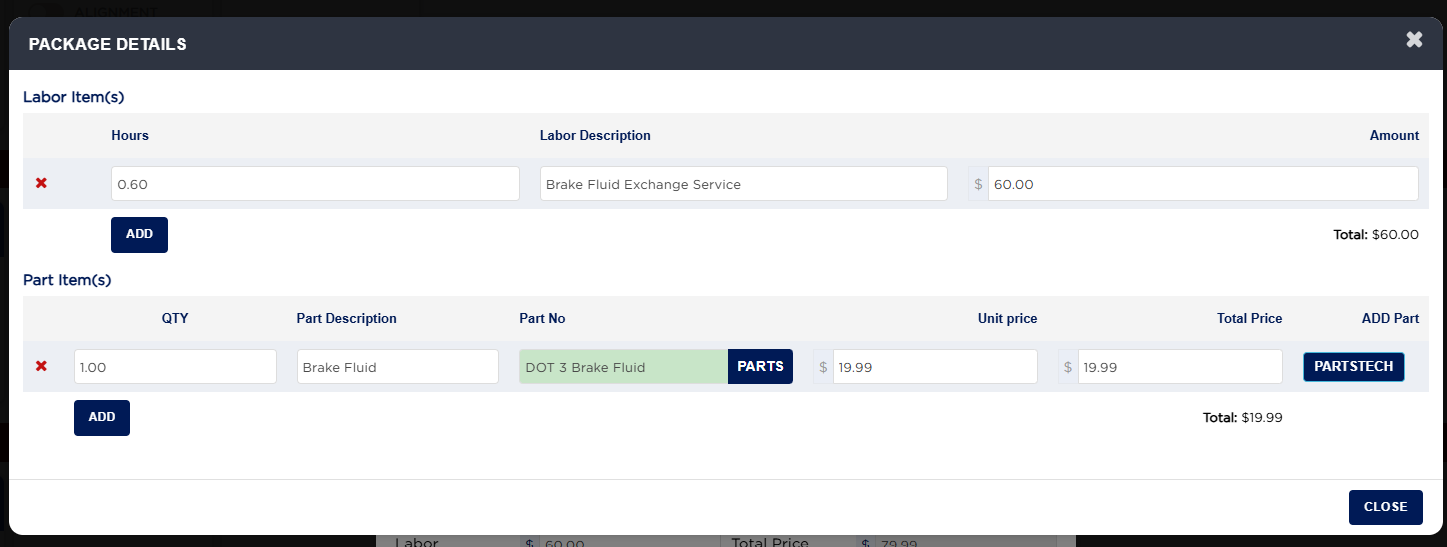
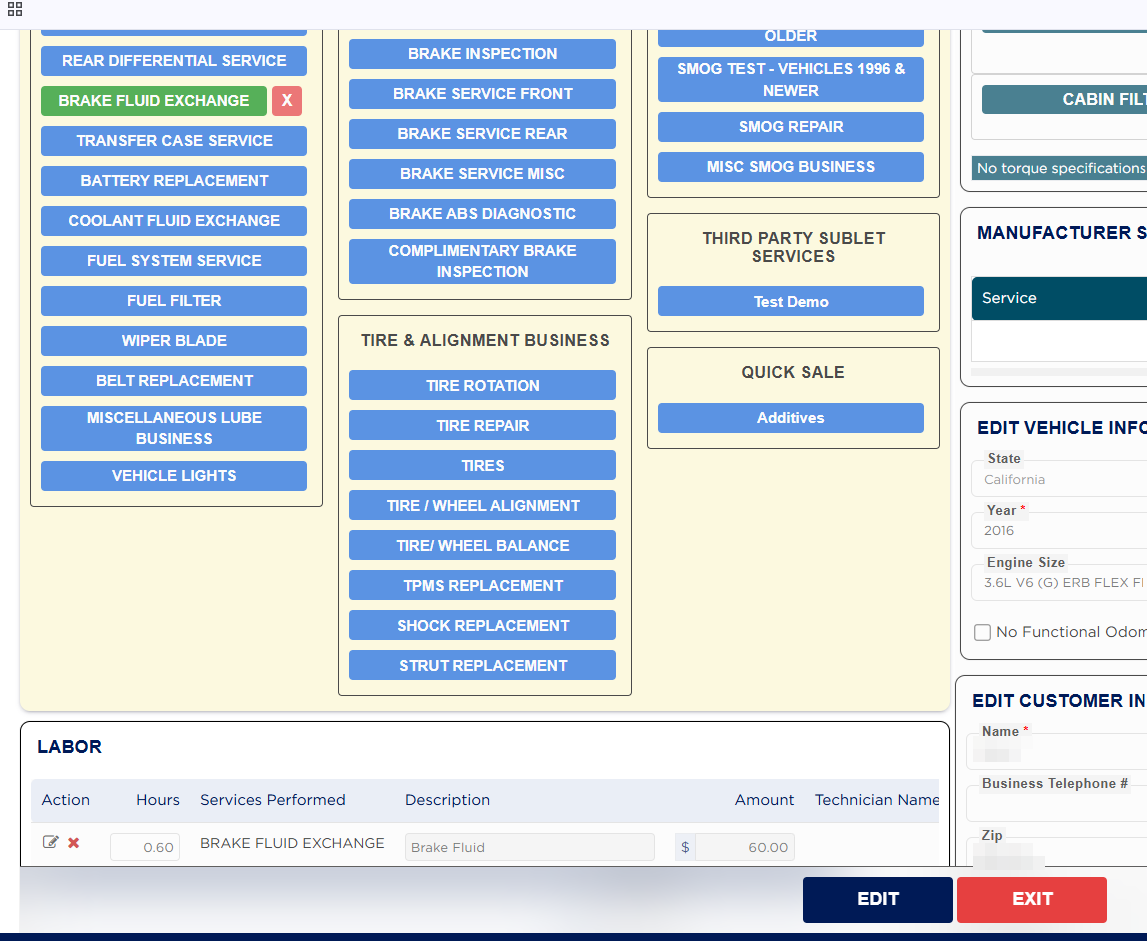
  10. On the invoice, each approved item's parts and labor are added as normal lines, for example BRAKE FLUID EXCHANGE, 0.60 hours, $60.00. The approval is also recorded under the invoice's estimate revisions.
Manual approval with notes and Read More
Manual approval with one item approved and signed
Manual approval with one approved and one declined item
Manual approval with Order Part From PartsTech
Card after approval showing PERFORMED - ORIG SUGGESTED
Customer approval page item cards
Customer approval page with initials, signature and totals

How do I send the inspection to the customer for approval? #

  1. From the Home Screen, click Invoices → Invoice List, open the invoice and click INSPECTION FORM.
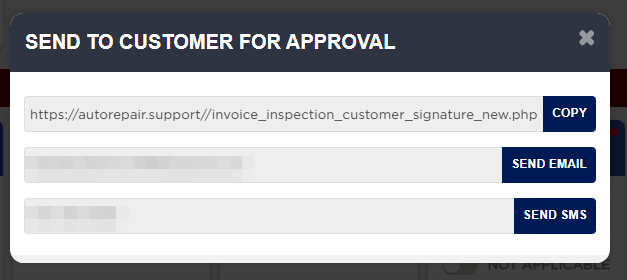
  2. Click INSPECTION SMS/EMAIL APPROVAL. Send to Customer for Approval shows the approval link with COPY, the customer's email with SEND EMAIL, and their mobile number with SEND SMS. The email and mobile come from the invoice; SEND EMAIL is off when the customer has opted out of email, and the SMS row appears only when your store has text messaging.
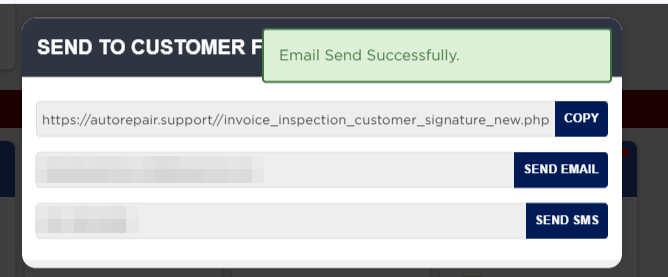
  3. Click SEND EMAIL. "Email Send Successfully." confirms it.
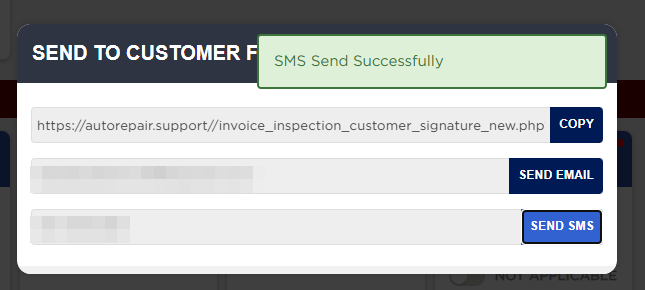
  4. Or click SEND SMS: "SMS Send Successfully". If the text cannot be sent, the reason shows in red, for example when the "Inspection customer approval initial SMS" message is turned off under System Setup Tools › System Autoresponder.
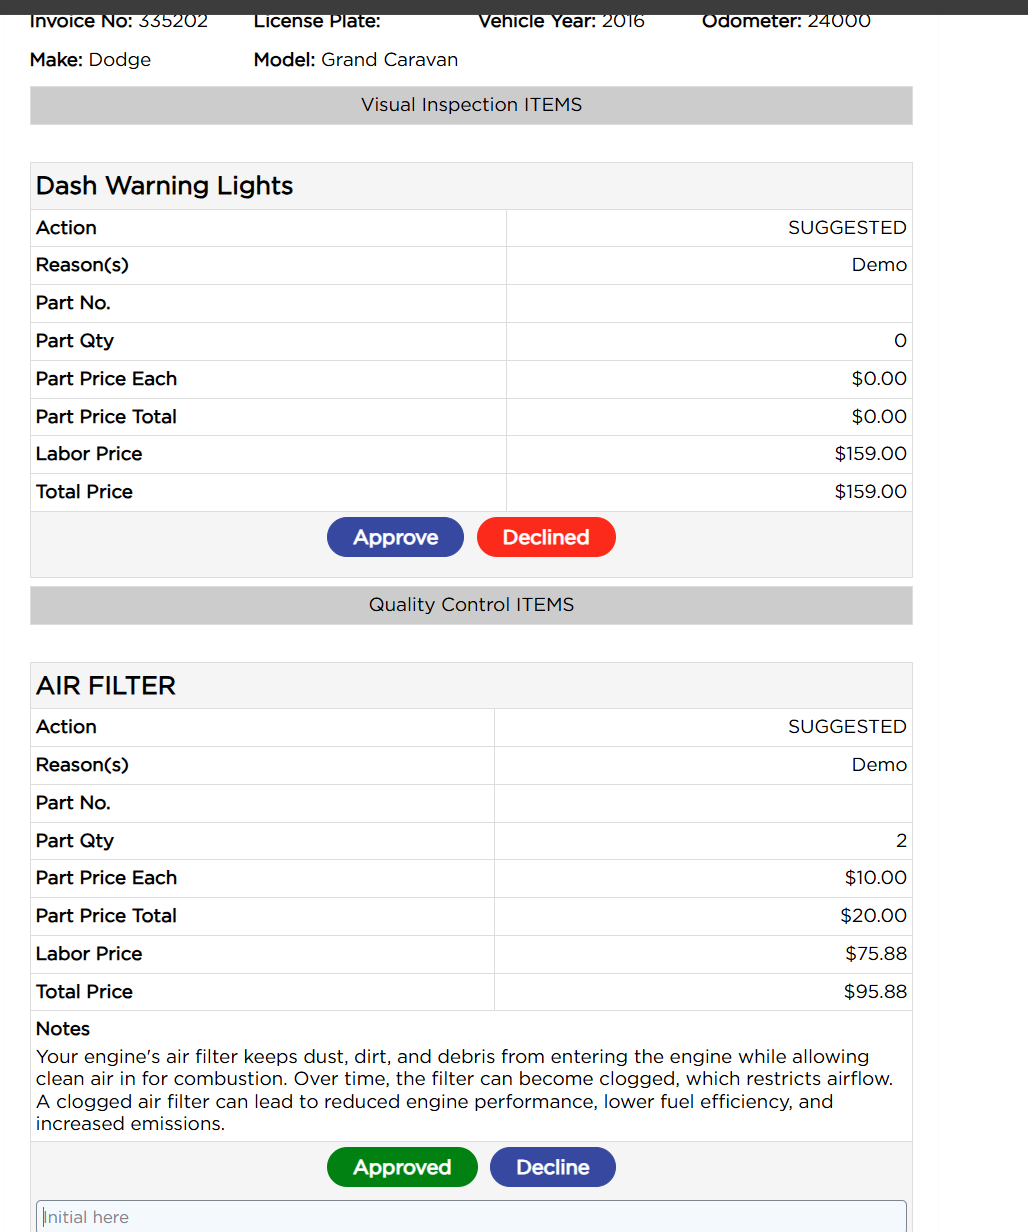
  5. The customer opens the link on their phone. The page shows the store, INSPECTION FORM, the vehicle, and each recommended item under its section with its Action, Reason(s), Part No., Part Qty, Part Price Each, Part Price Total, Labor Price and Total Price, any photos, videos and notes, and Approve / Decline. Items with several lines have a PACKAGE DETAILS button.
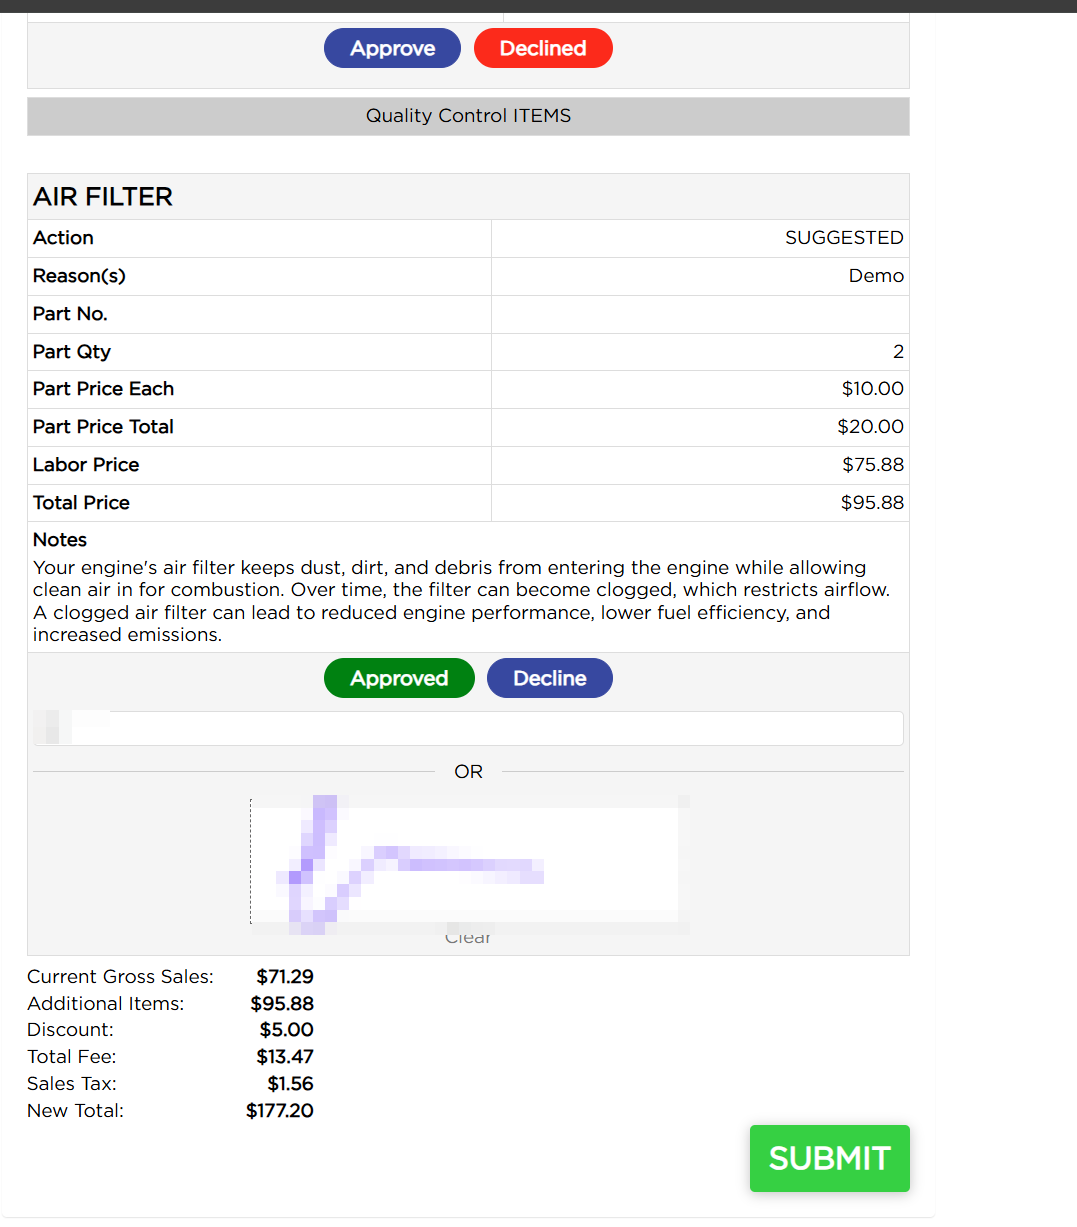
  6. The customer taps Approve (it turns green, Approved) and types their initials in Initial here or signs in the box; or taps Decline (red, Declined). The totals update as they go. Example: Current Gross Sales $71.29 + Additional Items $95.88 − Discount $5.00 + Total Fee $13.47 + Sales Tax $1.56 = New Total $177.20. They then tap SUBMIT; every item must be approved or declined first.
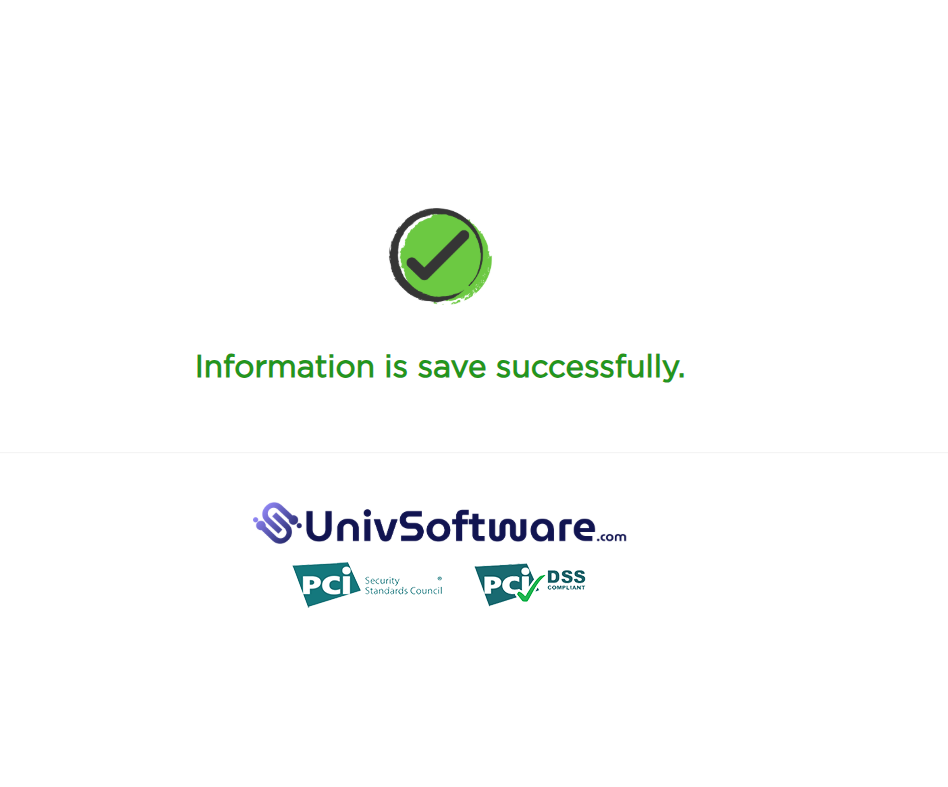
  7. The customer sees "Information is save successfully." The shop is emailed and notified that the customer responded.
  8. The invoice is updated in the same way as a manual approval: approved items become invoice lines and their cards show PERFORMED; declined items go to SERVICES RECOMMENDED. The invoice works out its own total, which can differ by a few cents from the estimate on the customer's page ($177.45 on the invoice for the $177.20 example). Opening the link again shows "You have already responded to this request, hence the information is no longer available."
Send to Customer for Approval dialog
Email Send Successfully message
SMS Send Successfully message

Why won't the inspection let me go back to the invoice? #

  1. From the Home Screen, click Invoices → Invoice List, open the invoice and click INSPECTION FORM.
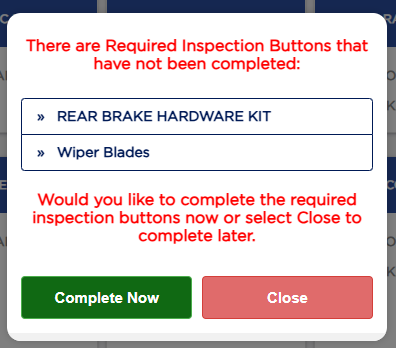
  2. Click CLOSE. If items that must be completed have no result yet, ARM lists them: "There are Required Inspection Buttons that have not been completed:" followed by the items, and "Would you like to complete the required inspection buttons now or select Close to complete later."
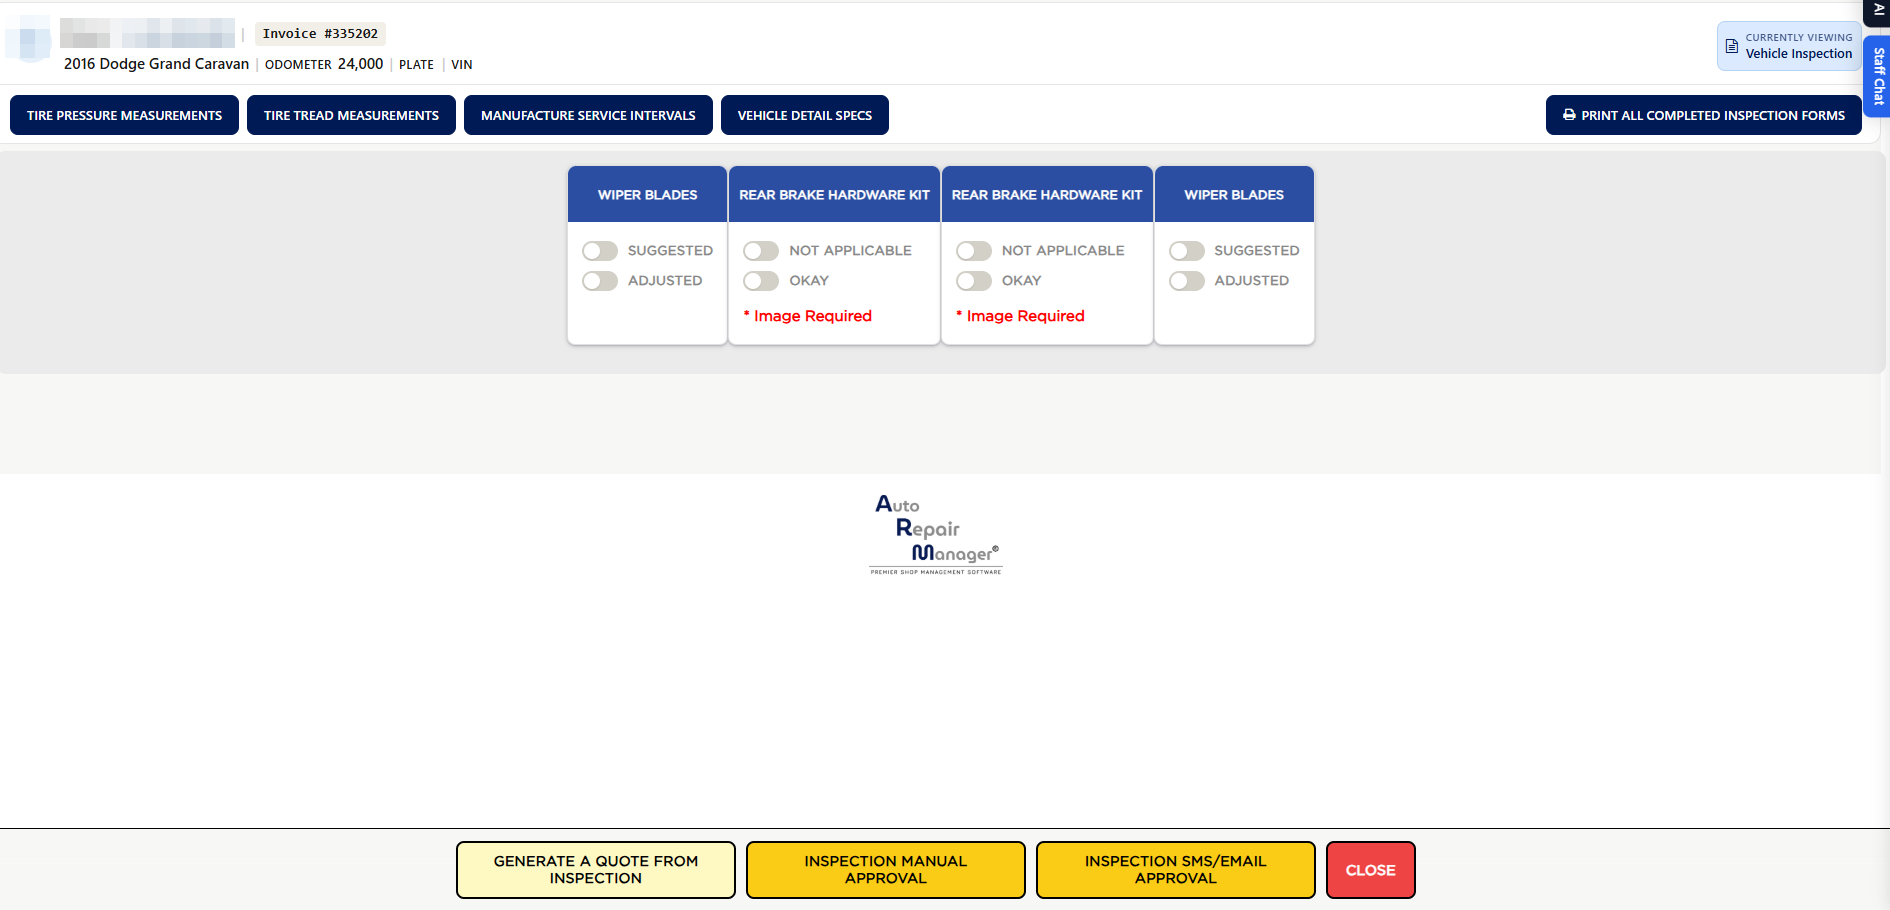
  3. Click Complete Now to see only those items, fill them in, and they disappear as you save them. Or click Close to go back to the invoice and finish later.
Required Inspection Buttons not completed prompt
Required-only view after Complete Now
About this screen

The inspection belongs to the invoice: every inspection form your shop has switched on appears as a tab, on every invoice, in the order set up for your store. If another user is editing the invoice, a message says "Sorry! You are not allowed to edit this invoice because user <name> is already editing this invoice." with RELEASE INVOICE and CANCEL. The inspection can still be opened after the invoice is finalized.

CANCEL on a new item closes the window and turns the status off again. Choosing a different package, or opening PACKAGE DETAILS, changes the item's parts and labor straight away, even if you then click CANCEL, so check the lines before leaving the window.

Turning an item off deletes its notes, reasons, photos, price and any PartsTech quote for it. Work already approved onto the invoice stays on the invoice.

When PartsTech labor comes back and the item has exactly one labor line, that line is updated; otherwise the PartsTech labor is added as another line. The part is ordered from the supplier only when the customer approves the work (see Inspection Manual Approval).

Declined items, and items left without a choice, go to the invoice's SERVICES RECOMMENDED tab, and appear as prior recommendations on the vehicle's next invoice. When Order Part From PartsTech is on, submitting places the order with the supplier and records it as an outside parts purchase.

After the customer has responded, INSPECTION MANUAL APPROVAL shows no items until the inspection is sent again. To resend, open INSPECTION SMS/EMAIL APPROVAL and click SEND EMAIL or SEND SMS again.

Close never stops you leaving, but an invoice cannot be finalized while a required inspection item is still empty; finalizing shows "Required Inspection Item Not Entered" with a button back to the inspection. An item counts as done as soon as it has any result.


People also ask

  • asked 1×
  • asked 1×
  • asked 1×
  • asked 1×
  • asked 1×

Ask AI