ARM Help

Detailed Flag Hours Report By Employee

Detailed Flag Hours Report By Employee lists every piece of flagged labor your technicians were credited with over a period, one line per labor item on an invoice, grouped under the technician who did it. Against each job it shows the hours flagged, what those hours come to as flat pay for the technician, and what the same labor was billed to the customer — so you can see both sides of a job on one line. Use it to work out flat-rate pay at the end of a period, to check that hours are being flagged against the right technician, and to compare what a technician earns on a job against what the job brought in.

3 how-to answers 5 screenshots Open in ARM Markdown

How do I run the Detailed Flag Hours Report By Employee? #

  1. From the Home Screen, click Reports → Employee & Payroll Reports → Detailed Flag Hours Report By Employee.
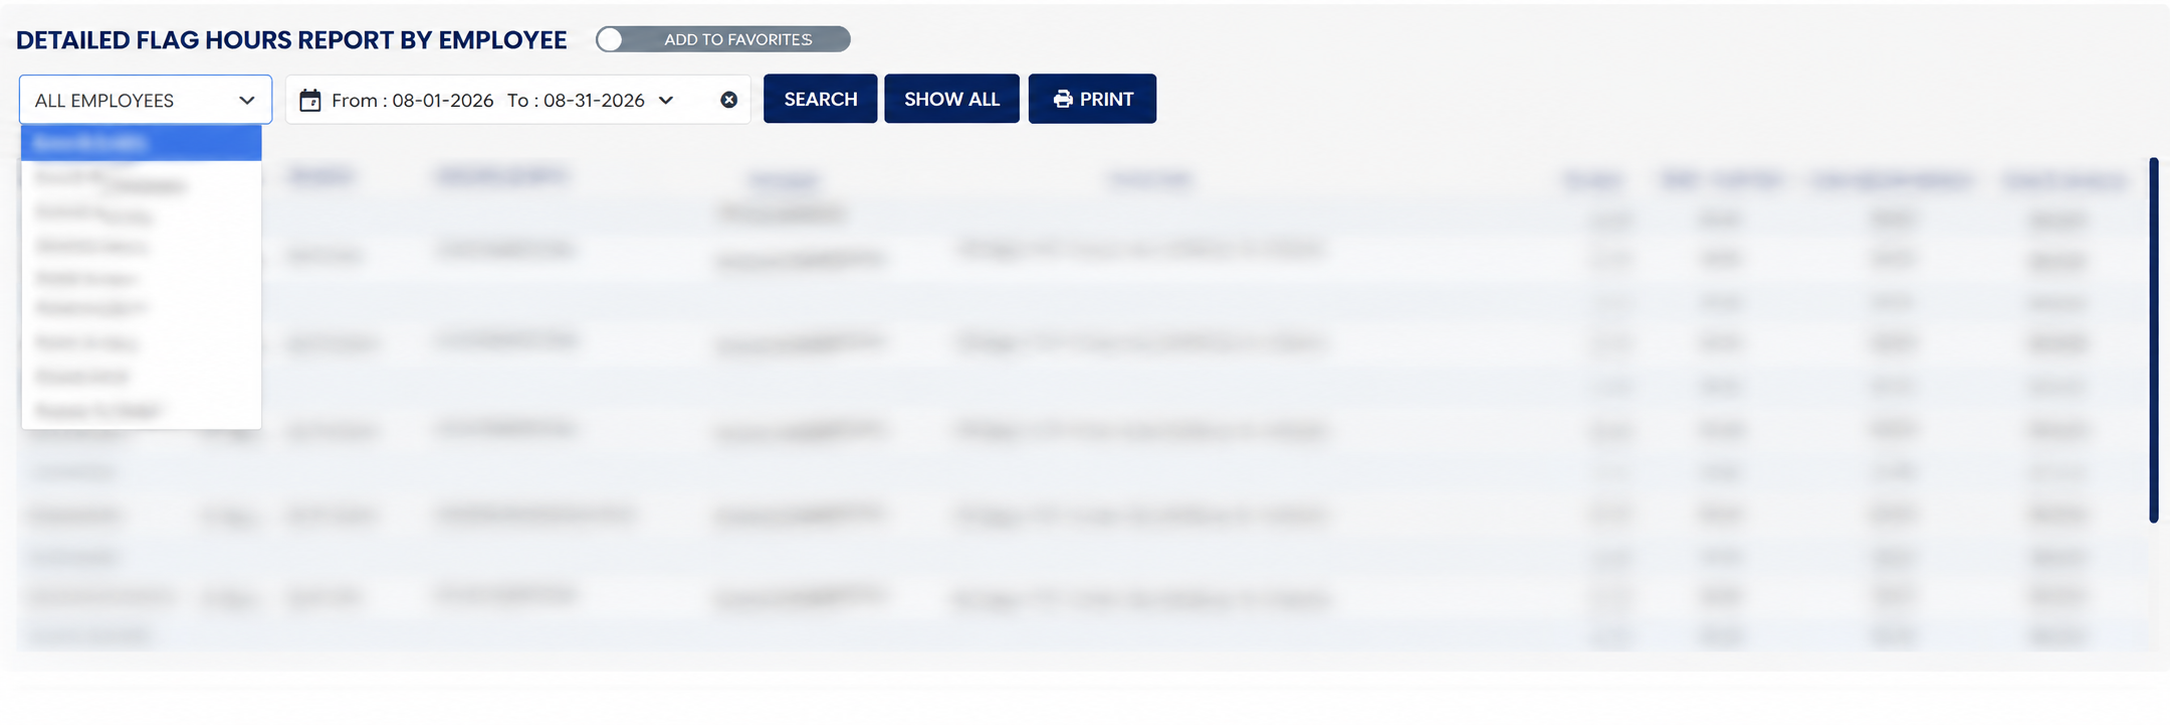
  2. Click the From : … To : … date box and pick the first and last day of the period. The box opens with Today in both halves, so the report is empty until you widen it. Today, Yesterday, This Week and Last Week are offered as shortcuts, or drag out any range you like. Lines are picked up by the date the invoice was finalized, not the date the work was booked in.
  3. Pick a name in the employee list on the left to see one technician, or leave it on All Employees for everyone. Changing the name reloads the report on its own — you do not need to press anything.
  4. Click SEARCH to load the report. SHOW ALL clears the employee filter and reloads on the same dates.
  5. Click PRINT for a PDF copy. It appears only when the report has lines, and there is no spreadsheet download on this report.
Detailed Flag Hours Report By Employee date range and filters

How do I work out a technician's flat pay from the report line? #

  1. From the Home Screen, click Reports → Employee & Payroll Reports → Detailed Flag Hours Report By Employee, run it for your date range and pick one line.
  2. Start with FLAG HOURS: the hours booked against that technician for that labor item, taken from the labor line on the invoice. Example: invoice 335056, an oil change on a 2011 Acura TSX, 0.90 flag hours.
  3. ARM multiplies those hours by the flat rate held on that labor line. The rate itself is not a column on this report, so to read it back, divide: TOTAL FLAT PAY ÷ FLAG HOURS. Example: $22.50 ÷ 0.90 = $25.00 an hour.
  4. TOTAL FLAT PAY is therefore FLAG HOURS × the flat rate. Example: 0.90 × $25.00 = $22.50. Check it against the next line down, invoice 335057: 1.00 × $25.00 = $25.00.
  5. TOTAL LABOR ON INVOICE is separate — it is what the customer was billed for that labor, and it is not worked out from flag hours at all. Example: $35.00 on invoice 335056 and $159.00 on invoice 335057. The gap between the two columns is what the labor contributed before parts.
  6. A line can carry hours with no pay, or pay with no hours. An item flagged at 0.00 hours earns $0.00 whatever it was billed at — the 2015 GMC Terrain air filter on invoice 335053 was billed $318.00 in labor and earned nothing, because no hours were flagged against it.
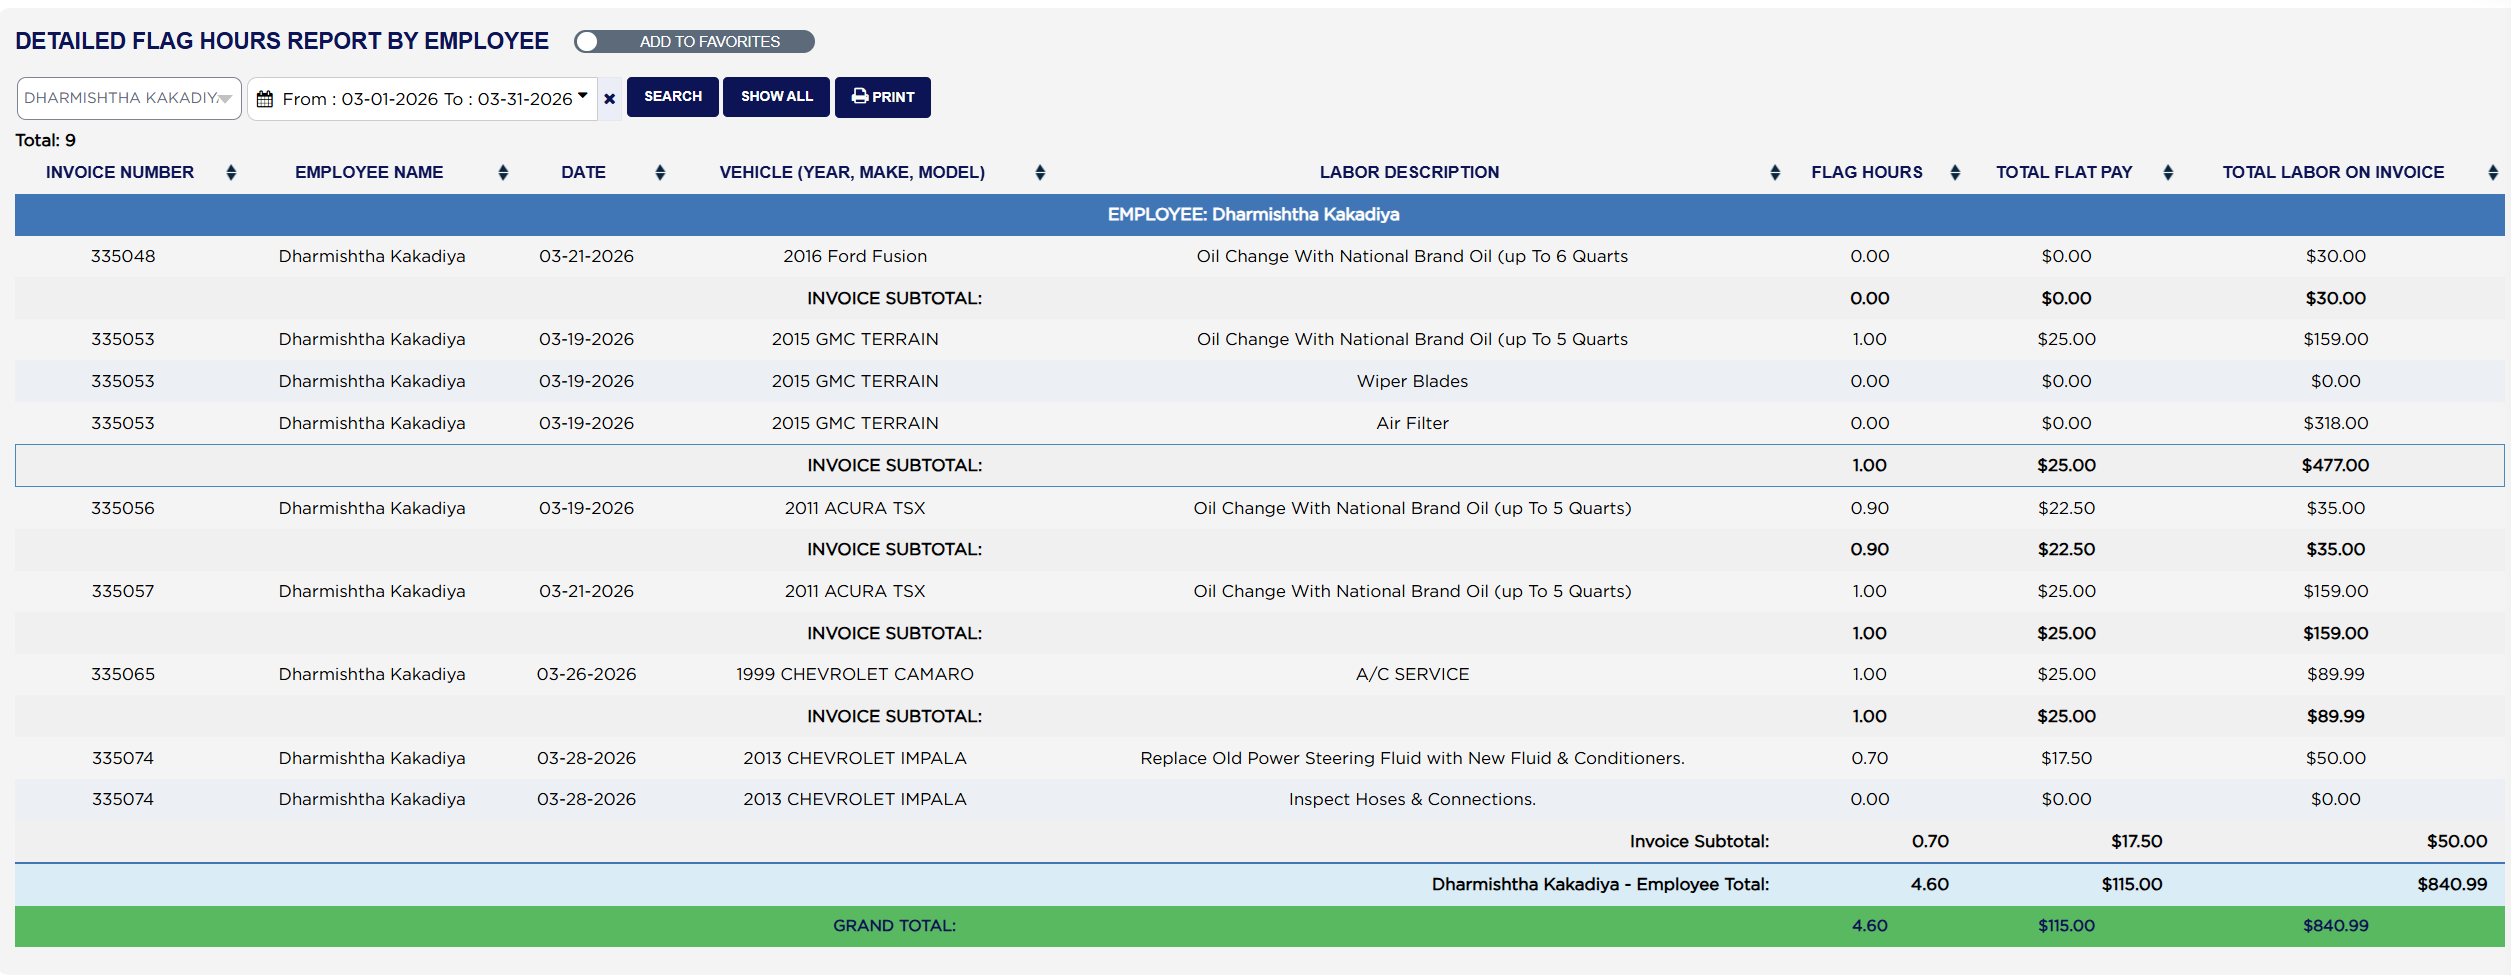
  7. The INVOICE SUBTOTAL: row adds the three figures for one invoice, the Employee Total row adds them for the technician over the period — 4.60 hours, $115.00 of flat pay against $840.99 of labor billed — and the green GRAND TOTAL does the same across every technician on the page.
Detailed Flag Hours Report By Employee flagged jobs with the grand total
Detailed Flag Hours Report By Employee rows used in the calculation example

How do I print a period for a technician to sign? #

  1. From the Home Screen, click Reports → Employee & Payroll Reports → Detailed Flag Hours Report By Employee.
  2. Set the date range to the pay period, and pick the technician in the employee list if you want one person on their own.
  3. Click PRINT. The PDF opens in a new tab.
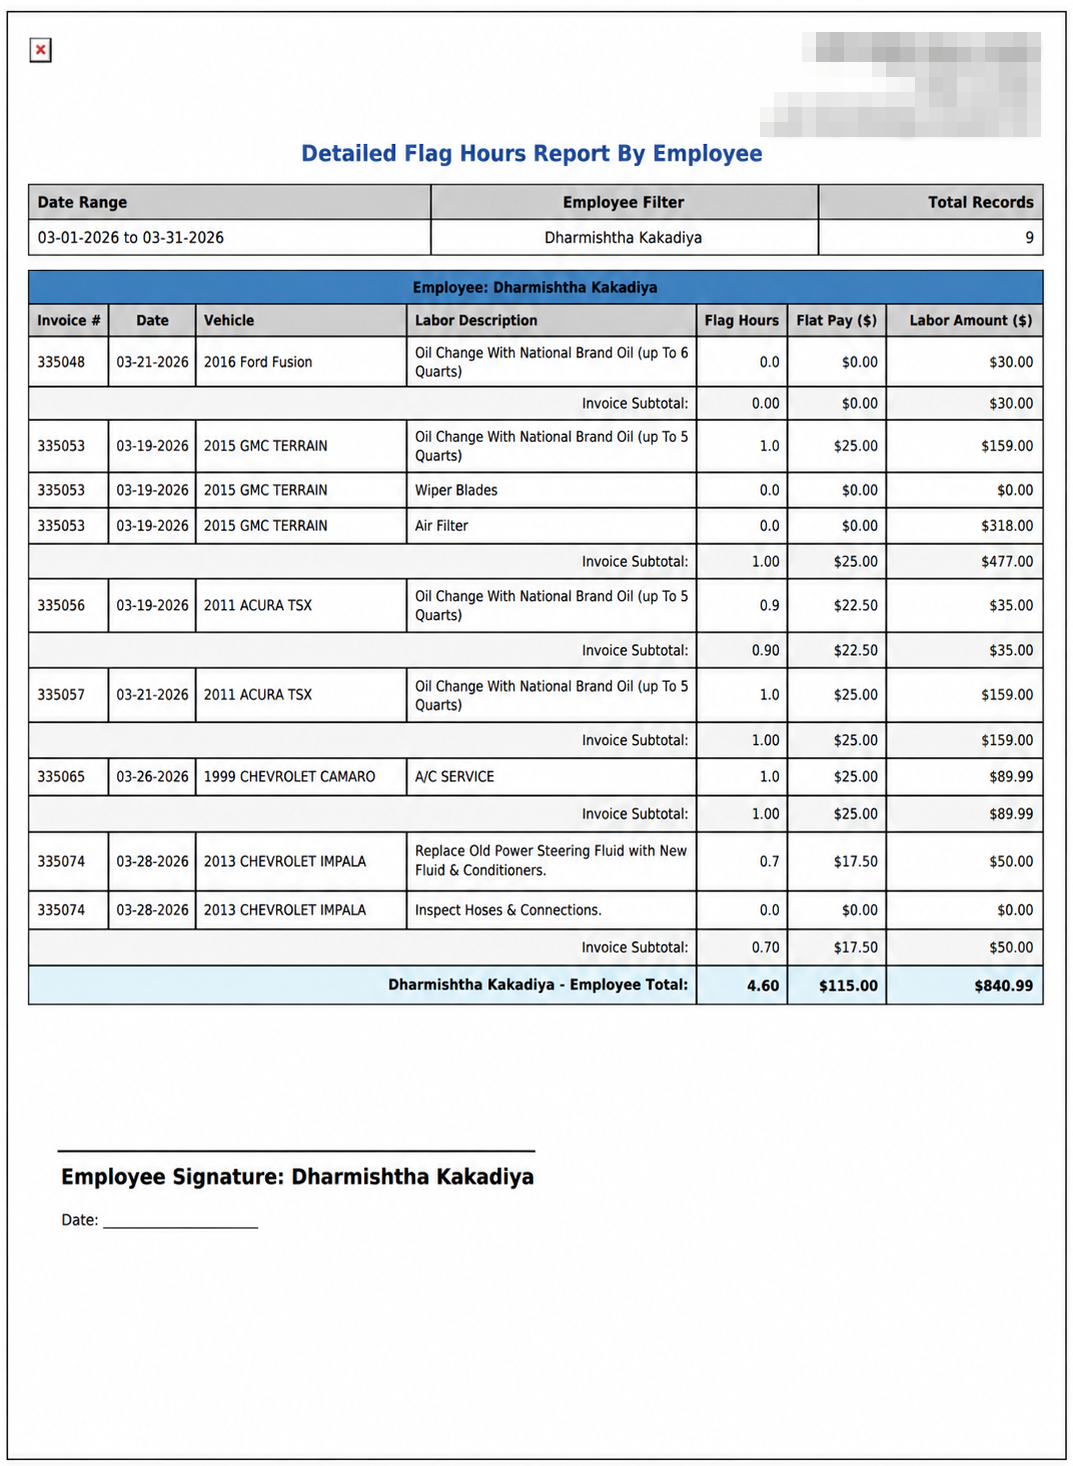
  4. Every technician gets their own page, headed with your store details, the report name, and a strip showing the Date Range, the Employee Filter you used and the Total Records returned. Under it is that technician's table — Invoice #, Date, Vehicle, Labor Description, Flag Hours, Flat Pay ($) and Labor Amount ($), the same seven columns as the screen under shorter names — with an Invoice Subtotal: row after each invoice and an Employee Total: row at the end.
  5. Under the table is an Employee Signature line with the technician's name printed beside it and a date line beneath, so the page can be signed off as the record of what was flagged.
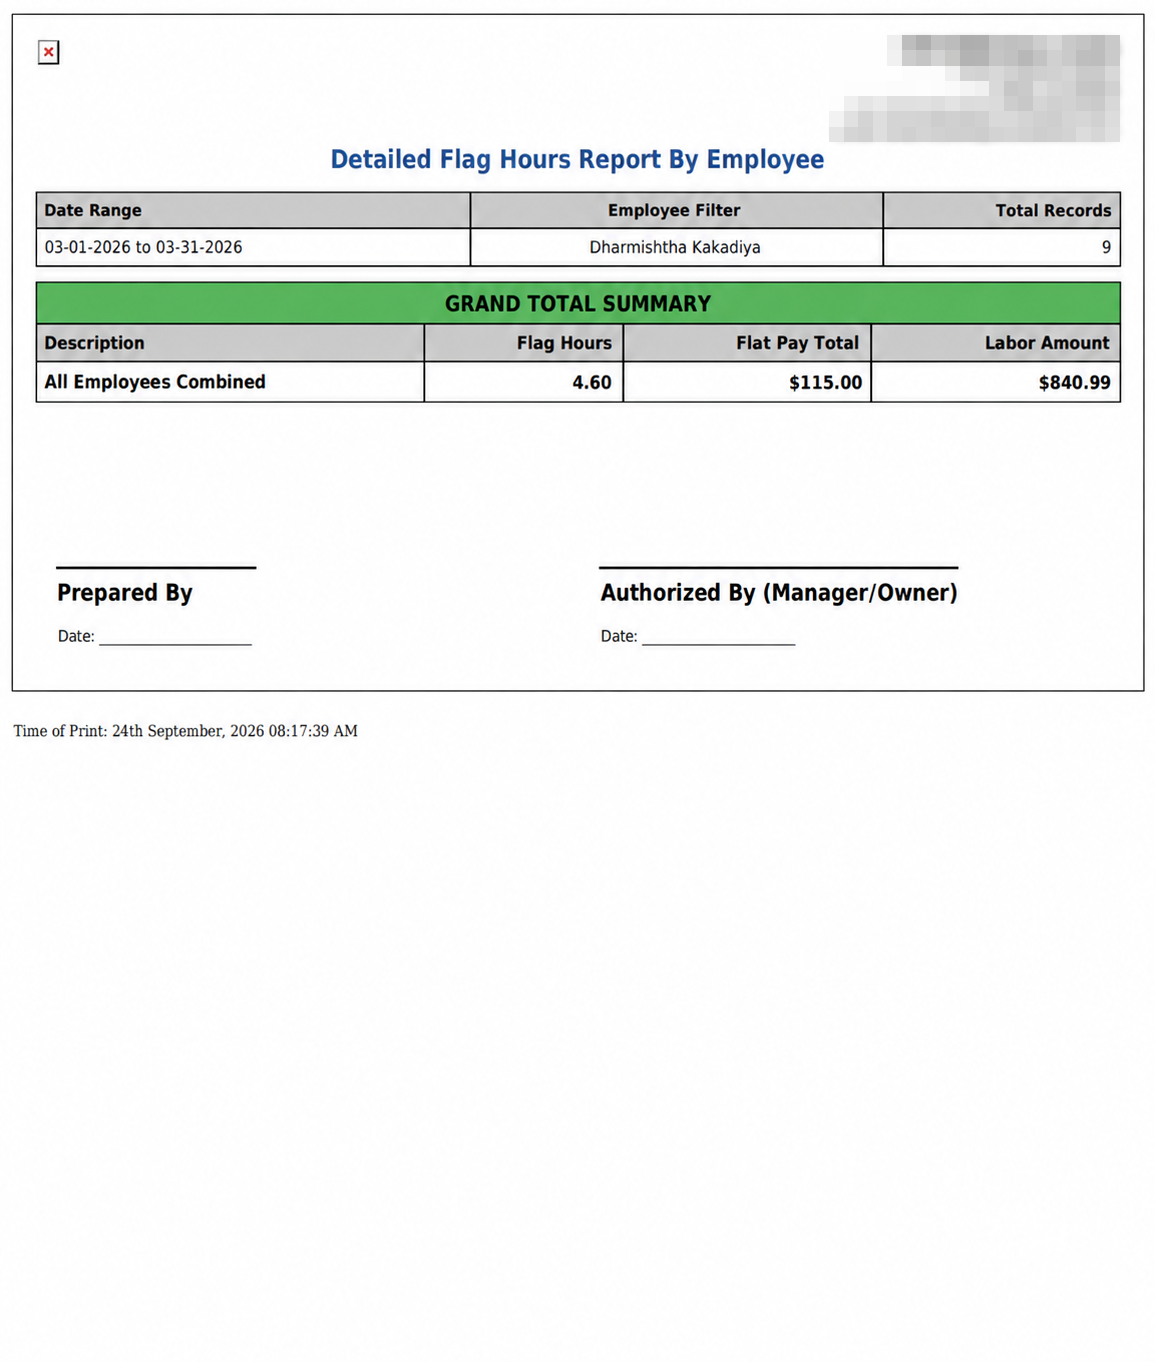
  6. The last page of the PDF is a green GRAND TOTAL SUMMARY carrying one row of Flag Hours, Flat Pay Total and Labor Amount for the whole run, with a Prepared By and an Authorized By (Manager/Owner) signature block under it and the time of printing at the foot. The row is labelled All Employees Combined even when you have filtered the report to one person; it totals whatever the report covered, not the whole store.
Detailed Flag Hours Report By Employee print output employee page
Detailed Flag Hours Report By Employee print grand total summary page
About this screen

The employee list offers every technician who has ever had labor flagged to them, whatever dates you have chosen, so it is possible to pick a name and get an empty report. The date box will not let you start earlier than the day your store's records begin.

Each line shows the INVOICE NUMBER the work was billed on, the EMPLOYEE NAME credited with it, the DATE the invoice was finalized, the VEHICLE (YEAR, MAKE, MODEL) it was done on, the LABOR DESCRIPTION as it appears on the invoice, the FLAG HOURS booked against that technician for that job, the TOTAL FLAT PAY those hours earn them, and the TOTAL LABOR ON INVOICE — what the customer was charged for the same labor. The last two are different numbers doing different jobs: flat pay is what the work costs you in wages, labor on the invoice is what it brought in. The report is always ordered by employee, then by invoice, then by date.

The table is banded rather than flat. A blue EMPLOYEE: ‹name› bar opens each technician's block. Within it, a grey INVOICE SUBTOTAL: row closes off each invoice, adding the flag hours, flat pay and labor for that invoice alone — useful where one invoice carried several labor items. A pale blue ‹name› - Employee Total: row closes the technician's block with their totals for the whole period. At the very foot of the table, a green GRAND TOTAL: row adds every technician together.

The green GRAND TOTAL adds up the page you are looking at, not the whole report. Where the report runs to more than one page — and over a wide date range with every employee it easily runs to hundreds — paging forward changes the figure. The printed PDF has no such limit: it covers the whole date range in one go. When the two disagree, the printout is the one to trust.

Lines whose labor was never assigned to anyone show a blank EMPLOYEE NAME, and because there is no name to group them under they appear without a blue bar and without an employee total, while still counting toward the figures above. A long run of blank names is worth chasing back to the invoices, since that labor is not reaching anybody's pay.

Flat pay on this report is the flat rate held against each labor line at the time the work was billed, so changing a technician's rate today does not rewrite what a past period already shows. The ADD TO FAVORITES switch beside the report title saves a shortcut to the report under your favourites in the main Reports menu.
People also ask

  • asked 3×
  • asked 1×

Ask AI